Replacing a kitchen faucet might sound daunting, but with the right tools, you can tackle this home improvement task with confidence. Imagine transforming your kitchen space with a sleek, new faucet that not only enhances functionality but also elevates your kitchen’s style.
You might be wondering what exactly you need to get started. Well, you’re in the right place. This guide will walk you through the essential tools you’ll need to successfully replace your kitchen faucet. By the end, you’ll be equipped with all the knowledge you need to make this project a seamless experience.
So, if you’re ready to give your kitchen a fresh look and feel, keep reading to discover the tools that will make the process smooth and straightforward.
Basic Tools For Faucet Replacement
Replacing a kitchen faucet might seem daunting, but with the right tools, it can be a straightforward task. Knowing which basic tools to have on hand can save you time and frustration. So, before you roll up your sleeves and dive under the sink, let's ensure you're equipped with the essentials that make the process smooth.
Adjustable Wrench
An adjustable wrench is a must-have for loosening and tightening nuts. Its versatility is invaluable. It adapts to various sizes, meaning you won't need a bunch of different wrenches. Picture this: You're under the sink, and the faucet nut is stubbornly tight. An adjustable wrench lets you apply the necessary force without damaging the fixture. It's like having a reliable friend helping you tackle the job.
Basin Wrench
The basin wrench is your go-to tool for tight spaces. Its long handle and pivoting head make reaching difficult spots a breeze. Imagine trying to unscrew a nut tucked away behind the sink basin—this tool is designed for such tricky situations. If you've ever felt the frustration of not being able to reach a bolt, a basin wrench is your solution. It turns a challenging task into an achievable one.
Screwdriver Set
A screwdriver set is essential for removing screws and securing parts during installation. Different types are needed, so having both flat-head and Phillips screwdrivers is wise. Consider the times when you need to detach the handle or install a new part. A reliable screwdriver set ensures precision and ease. It's like having the right key to open every lock in your project.
As you gather these tools, think about the ease they bring to your faucet replacement. Have you ever started a project and realized halfway through you missed a crucial tool? Avoid that frustration by preparing ahead. With these basic tools, you're not just ready for faucet replacement; you're set to tackle any minor plumbing fix with confidence.
Credit: www.homedepot.com
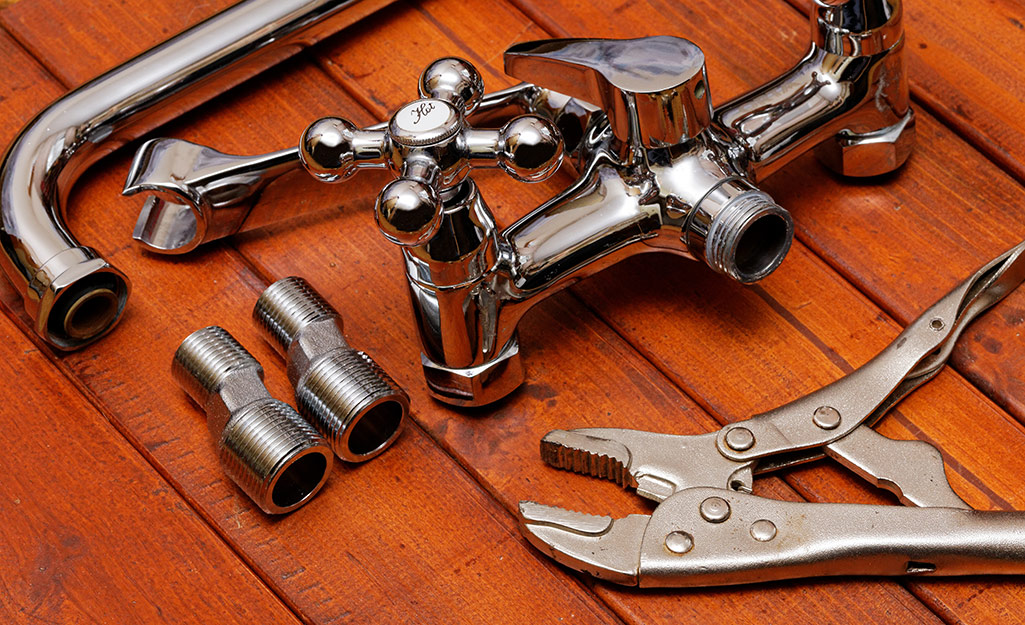
Specialized Plumbing Tools
Replacing a kitchen faucet requires essential plumbing tools. A basin wrench helps reach tight spots under the sink. Pipe wrench and adjustable pliers ensure secure tightening and loosening. Teflon tape prevents leaks by sealing thread connections.
Replacing a kitchen faucet can be a rewarding DIY project, but having the right tools is essential. While you might have a toolbox filled with basic items, specialized plumbing tools can make the task smoother and more efficient. These tools are designed to tackle specific plumbing challenges, ensuring you achieve a professional finish. So, are you ready to dive into the world of plumbing tools and discover which ones will become your best friends during this project?
Pipe Wrench
The pipe wrench is your go-to tool for gripping and turning pipes. It's designed with adjustable jaws, allowing you to tackle various sizes of pipes with ease. Imagine trying to loosen a stubborn nut under your sink; that's where a pipe wrench shines. It provides the leverage needed to break free tough connections without damaging the pipe itself. Next time you face a stubborn faucet nut, you'll be glad you have this tool in your arsenal.
Plumber's Tape
Plumber's tape, often called Teflon tape, is a lifesaver when it comes to sealing threaded connections. It's thin, flexible, and wraps around threads to prevent leaks. Remember that annoying drip you couldn't quite fix? Chances are, plumber's tape could have saved the day. It's easy to use—simply wrap it around the threads and screw the parts together. You'll appreciate its effectiveness in keeping your kitchen dry and your plumbing secure.
Plumber's Putty
Plumber's putty is a versatile material used to create watertight seals, especially around drains and faucets. It's soft and malleable, making it easy to apply in tight spaces. Ever had water pooling around your faucet base? Plumber's putty can help prevent that by sealing gaps and cracks. Roll it into a snake-like form and press it into place; it's as simple as playing with clay. With plumber's putty, you can achieve a snug fit and peace of mind knowing your sink area is protected from leaks. Embarking on a DIY project like replacing a kitchen faucet can be both exciting and daunting. However, with the right specialized plumbing tools, you'll find yourself more confident and capable. Have you ever attempted a plumbing task without the right tools and regretted it? Equipping yourself with these essentials will make the difference between frustration and satisfaction. So, which tool are you adding to your collection today?
Safety Equipment Essentials
Replacing a kitchen faucet is a rewarding DIY project. But safety matters. Proper safety equipment can prevent injuries. Before starting, ensure you have the right gear. This will protect you throughout the task.
Protective Gloves
Wearing protective gloves is crucial. They shield your hands from sharp edges. Plumbing parts can be rough or jagged. A good pair of gloves will offer grip and protection. Choose gloves that fit snugly for better control.
Safety Goggles
Safety goggles protect your eyes. Debris and water splashes can occur during the job. Goggles prevent any harmful contact. They provide a clear view while keeping your eyes safe. Make them a part of your toolkit.
Credit: www.today.com
Additional Handy Tools
Replacing a kitchen faucet isn't just about wrenches and screwdrivers. Some additional handy tools make the task smoother. These tools are often overlooked but can save you time and hassle. Let's explore a few essential extras to have on hand.
Bucket
A bucket is essential to catch any water left in the pipes. It prevents water from making a mess under the sink. Keeping a bucket nearby can save cleanup time.
Old Towels
Old towels are perfect for wiping spills and keeping the area dry. Place them around the workspace to protect surfaces. They also come in handy for cleaning your hands.
Flashlight
A flashlight is crucial for illuminating dark areas under the sink. It helps you see connections clearly. Ensure your flashlight is bright enough and has fresh batteries.
Choosing The Right Faucet
Choosing the right kitchen faucet can feel like finding a needle in a haystack. With countless options available, how do you know which one fits your kitchen best? Whether you’re updating your entire kitchen or just looking for a simple upgrade, picking the right faucet involves understanding its types and ensuring it complements your kitchen decor.
Understanding Faucet Types
Before diving into aesthetics, it’s crucial to know what types of faucets are available. You might be surprised by the variety!
- Single-handle faucets:These are easy to use and control temperature with just one hand. Perfect for when you're multitasking while cooking.
- Two-handle faucets:Offering better temperature control, these are ideal if you love precise water temperature settings.
- Pull-down faucets:A lifesaver for washing large pots and pans. If you often find yourself elbow-deep in dishes, this might be your go-to choice.
- Touchless faucets:For the tech-savvy, these offer a hygienic option with a simple wave of your hand to activate.
Have you ever tried adjusting water temperature with soapy hands and felt the frustration? The right faucet type can make everyday tasks more convenient. Think about how you use your kitchen sink and choose accordingly.
Matching Kitchen Decor
Once you’ve narrowed down the type, the next step is to make sure your new faucet matches your kitchen's style. A cohesive look can elevate your kitchen from ordinary to extraordinary.
Look around your kitchen. Is it modern with sleek, stainless-steel appliances? Then perhaps a brushed nickel or chrome faucet would blend seamlessly.
If your kitchen has a rustic charm, you might consider a bronze or copper finish. These can add warmth and character, creating a cozy atmosphere.
Remember, your faucet doesn’t have to match your appliances exactly, but it should harmonize with the overall theme. Consider colors and finishes that complement the existing design elements.
Finding the right balance between functionality and style can be tricky, but it’s worth the effort. A well-chosen faucet not only enhances your kitchen’s look but also makes your daily chores more enjoyable.
So, what’s your kitchen’s personality? And how will you let it shine through your faucet choice?
Preparing Your Workspace
Replacing a kitchen faucet requires a bit of preparation. A well-organized workspace makes the task easier and less stressful. Before starting, make sure your area is ready for the job. This includes clearing space under the sink and having all necessary tools at hand. Preparing your workspace saves time and helps avoid last-minute trips to the store.
Clearing Under The Sink
First, clear everything from under the sink. This might include cleaning supplies, sponges, and garbage bags. Removing these items gives you more room to work comfortably. It also prevents accidental spills or damage to your belongings. Keep a flashlight handy to see clearly in tight spaces.
Organizing Tools And Materials
Next, gather all the tools and materials you need. Essential tools include a basin wrench, adjustable pliers, and a screwdriver. You might also need plumber’s tape and a bucket to catch water drips. Lay these tools out neatly on a nearby surface. This organization ensures you don't misplace anything during the process. Double-check you have everything before starting to avoid interruptions.
Steps For Faucet Removal
Essential tools for replacing a kitchen faucet include a basin wrench, adjustable wrench, and plumber's tape. A screwdriver and penetrating oil may also be needed. Ensure all necessary tools are gathered before beginning the removal process for a smoother experience.
Replacing a kitchen faucet can seem daunting, but breaking it down into simple steps can make it quite manageable. The first part of the process is removing the old faucet. This task requires attention to detail and a bit of elbow grease. With the right tools and a systematic approach, you can successfully remove the old faucet and pave the way for a sparkling new one. Let's dive into the essential steps you need to follow for faucet removal.
Turning Off Water Supply
Before you start, ensure the water supply is completely turned off. Look under your sink for the shut-off valves. These are usually small knobs that you can twist clockwise to stop the water flow. If your kitchen doesn’t have shut-off valves, you may need to turn off the main water supply. This might be located in your basement or garage. Check if water is truly off by turning on the faucet to see if any water flows out.
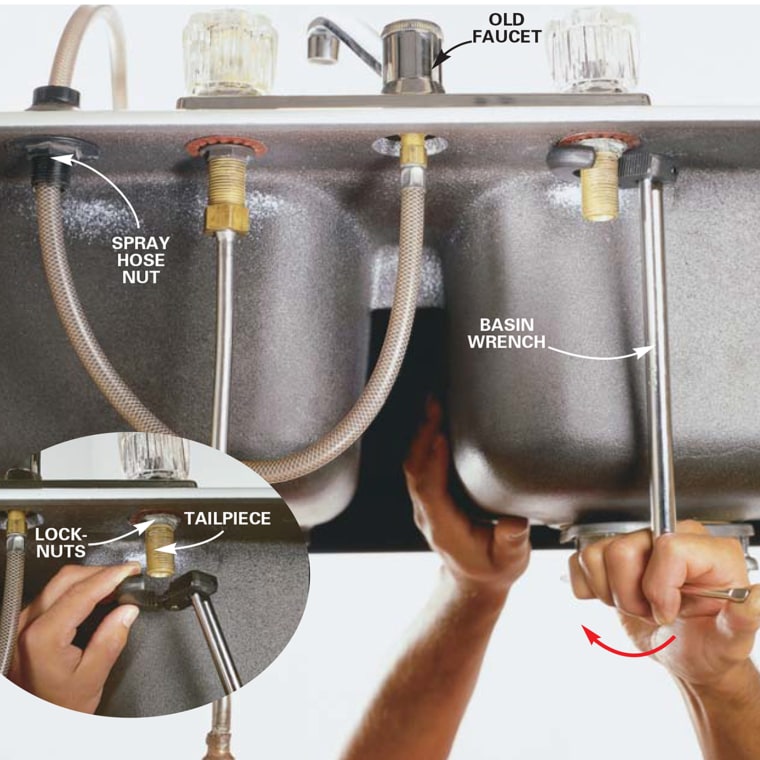
Disconnecting Old Faucet
Now, it’s time to disconnect the old faucet. Grab an adjustable wrench or a basin wrench, which are particularly useful for tight spaces under the sink. Loosen the nuts that secure the faucet to the sink. These are typically located at the base of the faucet underneath the sink. A flashlight can be helpful to see into the darker, cramped spaces. Once you’ve unscrewed the nuts, gently lift the old faucet from the top of the sink. If it seems stuck, it might be due to old caulk or sealant. A putty knife can assist in loosening any stubborn residue. Have you ever tackled a seemingly simple task, only to find it was more challenging than anticipated? Remember that patience and persistence are key when removing a faucet. You might even discover a sense of satisfaction when the old faucet finally comes free. Taking these initial steps with care will set the stage for a smooth installation of your new faucet. What are some of your experiences with home improvement projects? Feel free to share in the comments below!
:max_bytes(150000):strip_icc()/removing-a-faucet-2718826-09-1a4d7bf081884141a913248540354e42.jpg)
Credit: www.thespruce.com
Installing A New Faucet
Replacing a kitchen faucet requires a few basic tools. Gather an adjustable wrench, basin wrench, and plumber's tape. Don't forget a bucket to catch water and a towel for spills. These tools help make the installation process smooth and efficient.
Replacing your kitchen faucet can breathe new life into your kitchen and save you from pesky leaks or outdated fixtures. The task might seem daunting, but with the right tools and a little patience, you can have a shiny new faucet installed in no time. Imagine the satisfaction of turning on your faucet for the first time, knowing you did it yourself. Let's dive into the process and explore how you can install your new kitchen faucet with ease.
Positioning The New Faucet
Position your new faucet on the sink, ensuring the base aligns with the mounting holes. This step is crucial because a misaligned faucet can lead to leaks or instability. Is your faucet centered and the handles within easy reach? Double-check, as repositioning after securing can be a hassle. Take a moment to appreciate your work so far. This is the perfect time to make any last-minute adjustments before securing everything in place.
Securing And Testing
Once you’re happy with the position, it’s time to secure the faucet. Use the mounting hardware provided, tightening it under the sink. Make sure everything is snug, but avoid over-tightening, which can damage components. Next, reconnect the water supply lines to the faucet. Turn the water on slowly and check for leaks. Testing is crucial. A small drip can turn into a big problem. Keep a towel handy for any unexpected water spills. Finally, test the faucet by running hot and cold water. Is the pressure consistent? Do the handles turn smoothly? If all is well, you've successfully installed your new kitchen faucet. Take a moment to enjoy your accomplishment.
Troubleshooting Common Issues
Replacing a kitchen faucet requires basic tools. A wrench and screwdriver are essential for loosening and tightening connections. Plumber's tape ensures a secure fit, while a basin wrench reaches tight spots easily.
Replacing a kitchen faucet can feel like a straightforward task—until you encounter unexpected problems. Whether it's leaks, drips, or low water pressure, these issues can turn a simple project into a frustrating experience. Before you throw in the towel, let's troubleshoot some common problems together.
Leaks And Drips
Finding water pooling under your sink after installing a new faucet is concerning. Before calling a plumber, check the connections. Loose connections often cause leaks. Tighten the nuts and ensure all parts are aligned properly. Worn-out washers and seals can also lead to drips. Replace them with new ones if necessary. Keep spare washers handy. They’re inexpensive and can save you a trip to the hardware store. Have you ever noticed how some leaks seem to appear only after you thought everything was fine? Double-checking your work can often reveal a small oversight.
Low Water Pressure
Low water pressure can be frustrating, especially when you’re trying to rinse dishes. The first step is to check the aerator, as mineral deposits can block water flow. Unscrew it and clean any debris. Another culprit could be the supply valves. Ensure they’re fully open. Sometimes, valves get accidentally turned during installation. Is your faucet still underperforming? Consider whether the problem lies with your home’s plumbing rather than the faucet itself. You might need to inspect the pipes for blockages or corrosion. Are you prepared to tackle these issues, or does the thought of troubleshooting make you nervous? Don’t worry—with a bit of patience and these tips, you can handle minor hiccups like a pro.
Frequently Asked Questions
What Basic Tools Are Needed For Faucet Replacement?
To replace a kitchen faucet, you'll need a wrench, pliers, and a screwdriver. These tools help in loosening and tightening connections. Also, a basin wrench is useful for reaching tight spaces under the sink.
Do I Need A Plumber's Tape For Faucet Installation?
Yes, plumber's tape is essential for ensuring a watertight seal on threaded connections. It prevents leaks and adds stability. Wrap it around threads before screwing them together for a secure fit.
Are Specialized Tools Required For Faucet Removal?
Specialized tools like a basin wrench can be helpful for removing faucets. This tool reaches tight areas under the sink. It provides leverage and eases the removal of nuts and bolts.
Can I Replace A Faucet Without Professional Help?
Yes, with the right tools and instructions, you can replace a faucet yourself. Follow a step-by-step guide for assistance. Ensure you have all necessary tools before starting the replacement process.
Conclusion
Replacing a kitchen faucet becomes simple with the right tools. A wrench, basin wrench, and screwdriver are essential. Plumber’s tape helps prevent leaks. A bucket catches water spills. With these tools, the task feels easier and more manageable. Always ensure you have the right size and type for your specific faucet.
This saves time and reduces frustration. Remember, patience is key when working on plumbing tasks. A well-done job ensures a long-lasting faucet and a smoothly running kitchen. Stay safe and enjoy the satisfaction of doing it yourself!