
Imagine having a stylish and functional piece of furniture in your kitchen that not only offers extra seating but also doubles as a clever storage solution. Sounds great, right?
If you're tired of cluttered countertops and want to maximize your kitchen space, building a storage bench could be your perfect DIY project. It's not just about aesthetics; it's about transforming your kitchen into a more organized and inviting space.
You don't need to be a woodworking expert to create something both beautiful and practical. In this guide, we'll walk you through the simple steps to build a storage bench that fits your kitchen's unique style and needs. By the end of this article, you'll have all the tips and tricks you need to tackle this project with confidence, ensuring that your kitchen becomes the heart of your home—tidy, efficient, and welcoming. Ready to get started? Let's dive in!
Materials And Tools Needed
Gather wood, screws, and hinges to start building your kitchen storage bench. Grab a saw, drill, and measuring tape for precise cuts. Assemble with a screwdriver, ensuring stability and durability.
Building a storage bench for your kitchen can be a rewarding project that combines functionality with style. Before you jump into creating your masterpiece, gathering the right materials and tools is crucial. This step sets the foundation for a smooth construction process and ensures your bench is sturdy and durable. Let's break down what you'll need to get started.
Materials Required
Selecting the appropriate materials is key to building a bench that lasts. Choose quality wood, such as pine or oak, for your bench. These woods are strong and offer a beautiful finish. Consider using plywood for areas that won't be visible. It’s cost-effective and adds structural support. Additionally, you'll need screws and wood glue. These materials will hold your bench together. Opt for stainless steel screws to avoid rust, especially in humid kitchens. A can of wood varnish or paint will protect your bench and give it a personal touch.
Essential Tools
A well-stocked toolbox makes the building process efficient. A power drill is essential for making precise holes. It speeds up the process compared to manual screwdrivers. Don't forget a saw—whether manual or electric—to cut your wood to the desired size. Sandpaper is crucial for smoothing out rough edges. It helps prevent splinters and gives your bench a polished look. A measuring tape ensures accuracy. Measure twice before cutting to avoid costly mistakes.
Additional Items
Sometimes, small additions make a big difference. Consider adding hinges if your bench has a storage lid. Soft-close hinges enhance functionality and prevent loud slamming. Felt pads can be placed under the bench legs to protect your kitchen floor. Think about how you’ll personalize your bench. Adding cushions or decorative knobs can transform it into a centerpiece. What will make your bench uniquely yours? Building your kitchen storage bench can be more than just a task—it's an opportunity to express creativity. What unique elements will you incorporate into your design?
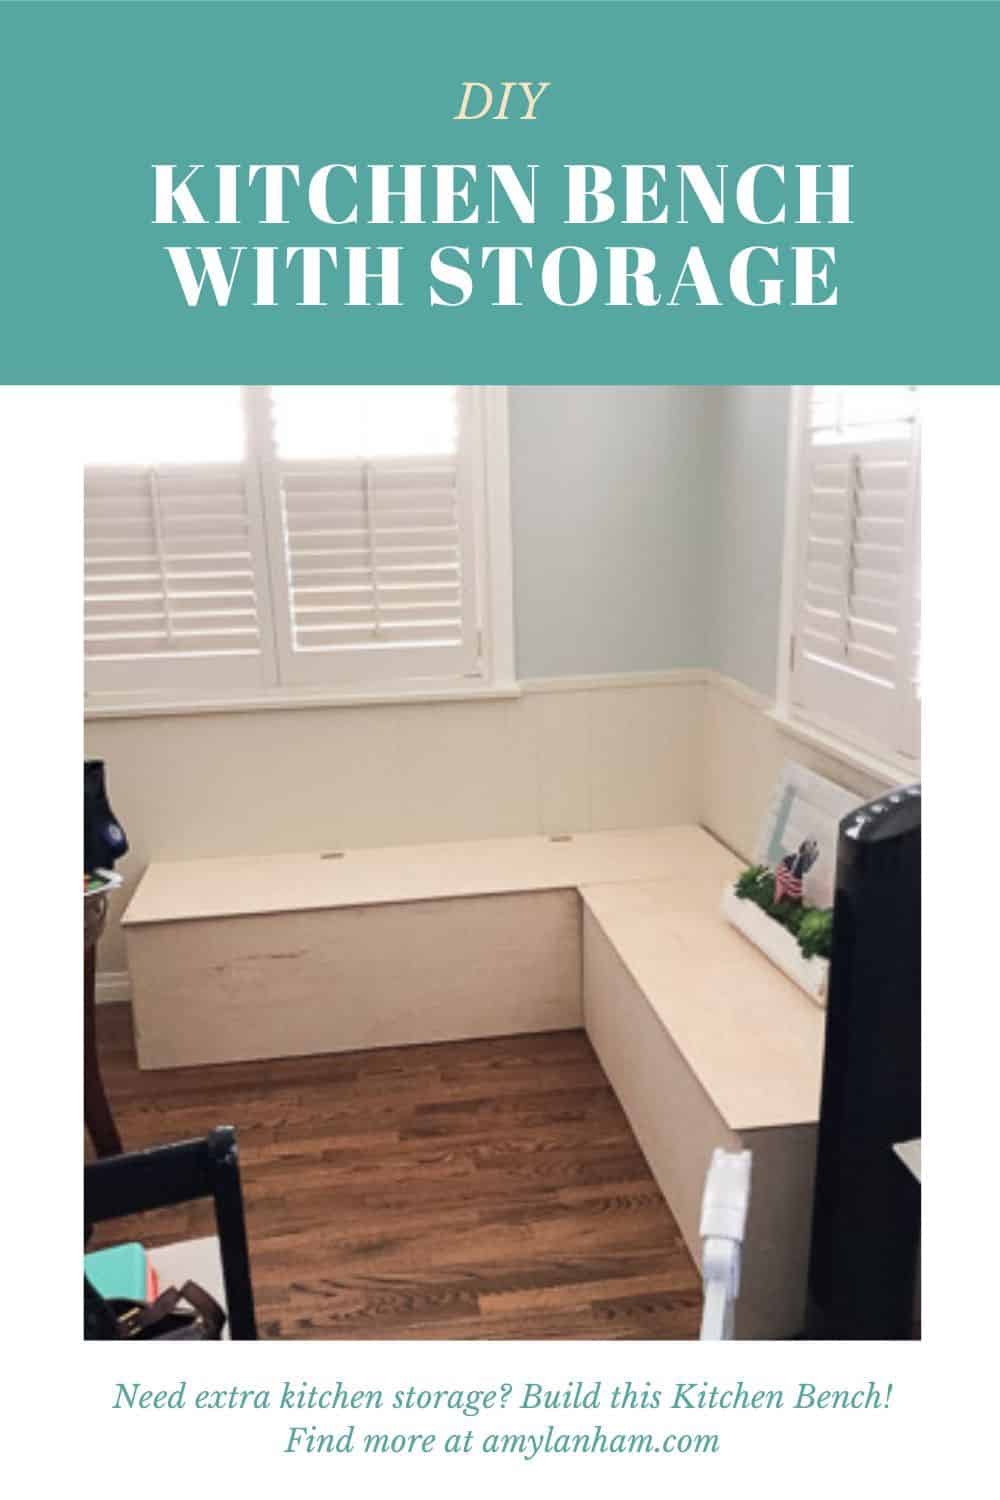
Credit: amylanham.com
Choosing The Right Wood
Choosing the right wood is crucial in crafting a storage bench for your kitchen. The type of wood you select will impact the bench's durability and appearance. Each kind of wood has unique characteristics. These can affect how the bench functions and looks in your space.
Understanding Wood Types
Hardwoods like oak and maple are popular choices. They offer strength and longevity. Softwoods such as pine are often cheaper. They can be easier to work with. Each wood type has distinct benefits and drawbacks.
Considering Durability
Hardwood is strong and lasts longer. It's perfect for busy kitchens. Softwood is less durable but easier to shape. Consider how much wear your bench will face.
Evaluating Wood Finish
The finish affects the bench's look and feel. A natural finish shows the wood's grain. A painted finish adds color. Think about your kitchen style before choosing.
Assessing Cost
Cost is important when picking wood. Hardwoods are more expensive. Softwoods offer a cheaper alternative. Balance cost with quality for the best choice.
Checking Sustainability
Sustainable wood is better for the environment. Look for certified options. They ensure responsible sourcing. Protecting forests is vital for future generations.
Testing Workability
Some woods are easier to cut and shape. Pine is soft and easy to handle. Oak requires more skill but is rewarding. Choose wood that matches your skill level.
Design And Measurements
Crafting a storage bench for your kitchen starts with precise design and measurements. Consider space, functionality, and material choices. Ensure accurate dimensions for a perfect fit, enhancing both storage and aesthetic appeal.
Design and measurements are the backbone of any successful DIY project, especially when crafting a storage bench for your kitchen. The right design ensures functionality, while precise measurements guarantee that your bench fits seamlessly into your space. Before you pick up your tools, take a moment to visualize how your storage bench will enhance your kitchen's efficiency and style.
Space Considerations
First, consider where your storage bench will reside. Is it near a window, in a cozy breakfast nook, or perhaps along an empty wall? Measure the area to determine the maximum dimensions your bench can occupy. Think about traffic flow. You don’t want your bench to block pathways or make the kitchen feel cramped. A good rule of thumb is to allow at least 3 feet of space between the bench and other fixtures.
Functional Design Features
What will you store in your bench? If you plan to stash away pots and pans, ensure the storage compartments are deep and sturdy. For linens or small appliances, adjustable shelves might be a wise choice. Consider adding a hinged lid for easy access. A cushioned top can double as seating, making your bench a versatile addition. Do you love to entertain? Your bench can serve as extra seating during gatherings. Incorporate thoughtful features like built-in dividers to keep items organized. You might even add a pull-out drawer for utensils or recipe books. A personal touch I added to my bench was a chalkboard panel, perfect for jotting down grocery lists or meal plans. How will you personalize your bench to suit your lifestyle?
Cutting And Preparing Wood
Crafting a storage bench for your kitchen begins with cutting and preparing wood precisely. Choose durable wood, measure accurately, and cut pieces to fit seamlessly. Ensure surfaces are smooth for easy assembly and a polished look.
Cutting and preparing wood is a pivotal step in building a storage bench for your kitchen. It’s where your vision begins to take shape, quite literally. With the right approach, this process can be both rewarding and efficient. You’ll need to focus on accuracy and safety to ensure the final product is both functional and aesthetically pleasing.
Safety Tips
Before you dive into cutting wood, prioritize safety. Always wear protective eyewear to shield your eyes from flying debris. Hearing protection is also important if you're using loud power tools. Keep your workspace clear of clutter, and ensure your tools are in good working order. A clean, organized area reduces the risk of accidents and helps you focus on precision.
Precision Cutting Techniques
Accuracy in cutting wood determines the smoothness of your bench assembly. Measure twice, cut once—this old adage saves you from costly mistakes. Use a quality saw that suits the type of cuts you’re making, such as a miter saw for angled cuts. Clamp the wood securely to prevent movement, and use a straight edge or guide for straight cuts. Have you considered using a laser guide? It can significantly improve your cutting accuracy. Whether you're a seasoned woodworker or a beginner, the right techniques and a focus on safety can make this task enjoyable. As you cut and prepare the wood, imagine the satisfaction of sitting on a bench you crafted yourself.
Assembling The Frame
Begin by gathering sturdy wooden boards for the bench frame. Secure the pieces using screws and brackets for stability. Ensure precise alignment for a neat, professional look.
Assembling the frame of your kitchen storage bench is a crucial step in the building process. This is where your vision starts to take shape, and you can see the structure coming together. Whether you’re a seasoned DIY enthusiast or a first-timer, this section will guide you through joining methods and ensuring stability.
Joining Methods
When building the frame, the way you join the pieces together can make all the difference. Consider using pocket-hole screws for a cleaner look and stronger joints. They are easy to use and provide a solid connection. Wood glue is another great option to add extra strength to your joints. Apply a thin line along the edges before screwing or nailing the pieces together. You might also explore dowel joints if you’re feeling adventurous. They require a bit more precision but offer a seamless finish.
Ensuring Stability
Stability is key to a long-lasting storage bench. Start by double-checking that your frame is square. Use a carpenter's square tool to confirm right angles at each corner. Think about the weight distribution of your bench. If it’s going to store heavy items, consider adding cross braces or a center support beam. These additions can prevent sagging over time. Regularly test your bench’s sturdiness by applying pressure on different areas. This simple practice can reveal weak spots early, allowing you to reinforce them before final assembly. Building a storage bench is not just about functionality; it’s about creating something that can be both beautiful and durable. As you assemble the frame, what personal touches will you add to make it uniquely yours?
Creating The Storage Compartments
Crafting storage compartments in a kitchen bench enhances organization. Start by measuring the space and selecting durable materials. Assemble sections carefully, ensuring easy access and optimal functionality.
Creating storage compartments in your kitchen bench can transform your space and keep clutter at bay. A well-organized kitchen enhances efficiency and makes cooking more enjoyable. Imagine easily finding every spice jar and pan without rummaging through chaotic drawers. By building a storage bench, you can maximize both style and functionality, making your kitchen a haven of orderliness.
Divider Installation
When installing dividers, think about what you need to store. Are you organizing pots, pans, or smaller items like utensils? Choose dividers that cater to these needs. Measure the height and width of your bench. This helps in cutting dividers to fit snugly. Use sturdy materials like plywood for durability. Secure the dividers with brackets or screws to prevent movement. This ensures your items stay in place, even with frequent use. Consider adjustable dividers for flexible storage options.
Maximizing Space
Utilize every inch of your bench by getting creative with your storage solutions. Do you have awkward corners or narrow spaces? Use them for storing less frequently used items or add hooks for hanging. Think vertically. Stack items or use tiered shelves to make the most of vertical space. This keeps the area tidy and accessible. Add baskets or bins for easy organization. Label them for quick identification. This approach keeps your bench tidy and helps you find items faster. Creating functional storage compartments doesn't have to be daunting. Have you ever thought about how much time you could save with an organized kitchen? With careful planning and a bit of effort, you can make your kitchen both beautiful and efficient.
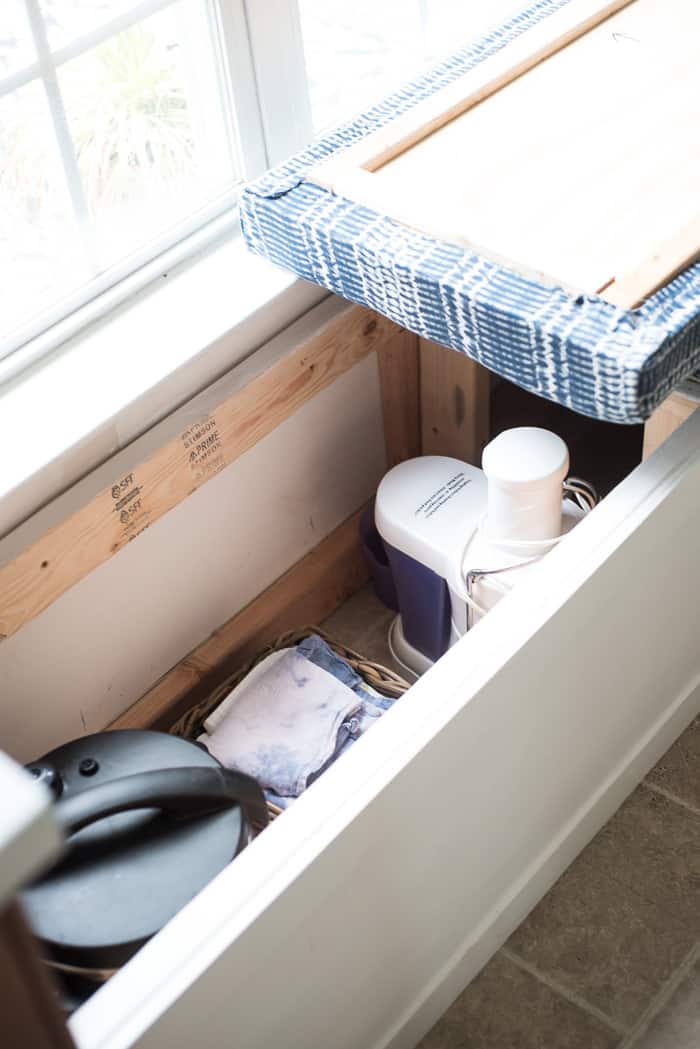
Attaching The Seat And Lid
Secure the seat and lid to the kitchen storage bench using sturdy hinges. Align them properly for smooth opening. This ensures easy access to stored items while maintaining a sleek appearance.
Attaching the seat and lid to your kitchen storage bench is a crucial step that combines functionality with style. It’s where your bench transforms from a simple box into a practical piece of furniture. You want it to look good and work perfectly, offering both storage and a comfy place to sit. By choosing the right hinges and considering comfort, you can achieve a seamless finish that makes your bench a treasured part of your kitchen.
Hinge Selection And Installation
Choosing the right hinges is like picking the perfect shoes for an outfit—they need to complement and support the overall structure. Consider the weight of the lid and how often it will be opened and closed. Heavy-duty concealed hinges can provide a sleek look while ensuring durability. When installing the hinges, make sure they are aligned properly. This prevents the lid from wobbling or getting stuck. Use a pencil to mark where the screws will go, and pre-drill the holes to avoid splitting the wood. Have you considered a soft-close hinge? It prevents the lid from slamming shut, which is a blessing in a busy kitchen. It’s a small detail but can make a big difference in everyday use.
Comfort Considerations
Think about the comfort of those who will sit on your bench. A hard wooden seat might be durable, but adding a cushion can make it inviting and cozy. Choose a fabric that is easy to clean, especially if you have kids or pets. Padding isn’t just for comfort; it adds an extra touch of style. Select colors and patterns that match your kitchen decor. It’s a chance to express your personality while ensuring the seat invites people to linger. How high is your bench seat? Ideally, it should allow you to sit with your feet flat on the ground. This promotes good posture and enhances comfort. Measure from the floor to the underside of the knees of the average user, and adjust the bench height accordingly. Building a storage bench is a rewarding project that not only adds storage but also enhances the functionality of your kitchen. By focusing on the details of attaching the seat and lid, you ensure that your bench is both practical and comfortable. What unique touches will you add to make it your own?
Credit: placeofmytaste.com
Finishing Touches
Completing a storage bench for your kitchen involves careful attention to details. The finishing touches bring your project to life. They enhance both its look and feel. A polished finish ensures durability and adds charm to your space. Let’s explore some key steps in this final stage.
Sanding And Smoothing
Sanding is crucial for a smooth, safe surface. Use fine-grit sandpaper for best results. Sand every inch of the bench. Pay attention to edges and corners. This process removes splinters. It also prepares the wood for paint or stain. After sanding, wipe with a damp cloth. This removes dust and debris.
Painting Or Staining Options
Choose between painting or staining your bench. Paint offers a variety of colors. It can match any kitchen style. For a classic look, white or pastel shades work well. Staining highlights the natural wood grain. It gives a warm, rustic feel. Select a stain that complements your kitchen decor. Apply with a brush in even strokes. Allow to dry thoroughly.
Decorative Elements
Create a stylish storage bench for your kitchen to enhance functionality and aesthetics. Incorporate decorative elements like colorful cushions or chic baskets for added charm and practicality. This DIY project maximizes space while adding a personalized touch to your kitchen decor.
Decorative Elements A storage bench in your kitchen doesn't have to be just functional; it can also be a beautiful piece that elevates your space. Imagine your kitchen bench as a blank canvas that can showcase your personal style. By adding decorative elements, you can turn your bench into a charming focal point. Let's explore how you can transform your bench with simple yet effective touches.
Adding Cushions
Cushions are more than just comfort—they're an opportunity to inject color and texture into your kitchen. Consider using cushions in bold colors or patterns to create a lively atmosphere. Think about the mood you want to set; do you prefer a cozy, warm vibe or a fresh, vibrant look? Mix and match different shapes and sizes for a playful arrangement. Cushion covers with removable fabric make cleaning easy, which is perfect for a kitchen setting. Choose materials that are durable and resistant to stains.
Incorporating Style Elements
Your bench can reflect your taste by incorporating style elements like paint, hardware, and accessories. Choose a paint color that complements your kitchen's palette. A fresh coat of paint can drastically change the look of your bench. Decorative hardware such as knobs and handles can add an elegant touch. Think of these as the jewelry for your bench—choose finishes that match your kitchen's style. Accessories like small plants or decorative trays can add life and personality. Consider what makes your kitchen feel like home and bring those elements to your bench. With the right decorative touches, your kitchen storage bench can be a reflection of your style. What details will you add to make it uniquely yours?

Credit: makingitwithabby.com
Maintenance And Care Tips
Building a storage bench for your kitchen is a practical choice. It offers extra seating and space for storing items. Keeping your bench in top condition requires regular care. Proper maintenance ensures longevity and functionality. Let's explore some essential tips to keep your bench looking great.
Regular Cleaning
Dust and dirt can gather on your bench. Wipe the surface with a damp cloth weekly. Use mild soap for stubborn stains. Avoid harsh chemicals. They can damage the finish. Ensure the bench is dry after cleaning to prevent moisture damage.
Protecting The Surface
Use placemats or coasters to protect the bench surface. This avoids scratches and water rings. Consider a protective finish if your bench is wooden. A clear varnish can offer an additional layer of protection.
Checking For Loose Parts
Regularly inspect your bench for loose screws or parts. Tighten any loose screws immediately. This prevents further damage and keeps the bench sturdy. If you find any major issues, consult a professional for repairs.
Preventing Moisture Damage
Keep your bench away from direct water sources. Avoid placing it near the sink. If the bench gets wet, dry it quickly. Moisture can lead to warping or mold growth.
Ensuring Proper Weight Distribution
Do not overload your storage bench. Distribute weight evenly in the storage area. This helps maintain the bench's structure and prevents damage.
Repainting Or Refinishing
If the paint or finish wears off, consider repainting. Choose a paint suitable for the bench material. Refinishing can refresh the look and protect the surface.
Frequently Asked Questions
What Materials Are Needed For A Kitchen Storage Bench?
To build a kitchen storage bench, gather plywood, screws, hinges, and a saw. You also need sandpaper, paint or stain, and a drill. These materials will ensure your bench is sturdy and functional. Choose high-quality wood to enhance durability and longevity in your kitchen space.
How Do I Design A Storage Bench?
Design your storage bench by measuring your kitchen space accurately. Consider the bench's height, width, and depth to fit seamlessly. Incorporate shelves or drawers for optimal storage. Sketch a simple blueprint, ensuring functional and aesthetic appeal. Select a design that complements your kitchen's style and enhances its usability.
Can I Build A Storage Bench Without Carpentry Skills?
Yes, you can build a storage bench with basic carpentry skills. Follow a detailed DIY guide, which simplifies each step. Use pre-cut wood and easy-to-handle tools. Ensure safety by wearing protective gear. With patience and precision, you can create a functional and stylish storage bench.
How Do I Maintain My Kitchen Storage Bench?
Maintain your kitchen storage bench by cleaning it regularly. Dust and wipe surfaces with a damp cloth. Check for loose screws or hinges periodically. Apply polish or varnish to preserve its finish. Ensure it stays dry to prevent warping. Proper maintenance keeps your bench looking new and efficient.
Conclusion
Building a storage bench for your kitchen is practical and rewarding. You gain extra seating and valuable storage space. The process is straightforward with the right tools and materials. Customize it to match your kitchen's style. Personal touches make it unique.
This project enhances both functionality and decor. Plus, it's a fun way to engage in DIY. Start today and enjoy the benefits. Your kitchen will look more organized and stylish. Embrace the creativity and transform your space. Happy building!