
Are you tired of the clutter around your kitchen sink? Those sponges, brushes, and cleaning supplies seem to multiply overnight, don’t they?
What if there was a simple solution to keep everything organized and easily accessible? Imagine having a neat and tidy sink area where every item has its place. This isn’t just a dream; you can make it a reality. By building your own kitchen sink storage trays, you’ll not only save space but also add a touch of personal flair to your kitchen.
You’re just a few steps away from transforming chaos into calm. Ready to dive into the world of DIY kitchen organization? Let's get started!
Credit: www.familyhandyman.com
Materials Needed
Creating kitchen sink storage trays requires gathering essential materials. These materials ensure your trays are sturdy and functional. With the right supplies, the assembly becomes straightforward. Let's explore the key materials needed for this project.
Wood Pieces
Use strong wood pieces for durability. Choose plywood or hardwood. Ensure they are cut to fit your sink dimensions.
Nails And Screws
Nails and screws hold the structure together. Opt for stainless steel to prevent rust. Ensure they match your wood thickness.
Wood Glue
Wood glue adds extra strength. Use it between wood joints. It helps keep the tray intact.
Sandpaper
Sandpaper smoothens rough edges. Choose a medium grit for best results. It ensures a polished finish.
Measuring Tape
Accurate measurements are vital. Use measuring tape for precision. Ensure your dimensions fit perfectly.
Paint Or Varnish
Paint or varnish adds a protective layer. Choose water-resistant options. They enhance the tray's appearance.
Brushes
Brushes apply paint or varnish evenly. Use a wide brush for large areas. Small brushes work for detailing.
Choosing The Right Design
Crafting the perfect kitchen sink storage tray involves selecting a design that maximizes space and functionality. Consider materials like plastic or stainless steel for durability. Opt for designs with compartments to organize cleaning supplies efficiently.
Choosing the right design for your kitchen sink storage tray is not just about aesthetics; it’s about functionality and maximizing space. You want a design that complements your kitchen while providing easy access to essentials. Whether you're a minimalist or a maximalist, the design you choose will impact how you interact with your kitchen daily.
Understanding Your Needs
Before selecting a design, consider what you actually need to store. Are you looking to organize cleaning supplies or your dishwashing essentials? Take stock of what items you frequently use. This will help you determine the size and compartments required for your tray.
Assessing Your Space
Measure the space under your sink. Knowing the dimensions will guide you in choosing a tray that fits perfectly. If your sink area is small, opt for a compact, multi-layered tray. Larger spaces can accommodate broader designs. Remember, a tray should enhance organization, not clutter it further.
Exploring Material Options
The material of the storage tray can greatly affect its durability and look. Plastic trays are affordable and easy to clean, while metal ones offer sturdiness and a sleek finish. Wooden trays add a touch of warmth but may require more maintenance. Think about which material best suits your kitchen environment.
Considering Customization
Personalization can make a significant difference. Adjustable dividers allow you to modify sections as your needs change. Consider a design with customizable features. This flexibility can save you the hassle of buying new trays whenever your storage needs evolve.
Balancing Aesthetics And Practicality
A well-designed tray should blend seamlessly with your kitchen decor. Choose colors and styles that match your cabinets and countertops. Balance visual appeal with practicality; a beautiful tray is useless if it doesn’t hold your items effectively.
Seeking Inspiration
Browse online or visit home improvement stores for inspiration. Seeing different designs can spark ideas and help you visualize what will work in your space. Sometimes, a design you hadn’t considered might turn out to be the perfect fit. Building the perfect kitchen sink storage tray is a personal journey. As you choose your design, think about how it will impact your daily routine. Will it make your chores easier? Is it visually pleasing yet practical? Your choice could transform your kitchen experience.
Measuring Your Sink Area
Before you start crafting your kitchen sink storage trays, the first step is measuring your sink area. This step ensures that your trays fit perfectly, maximizing both space and functionality. A well-measured tray can transform your kitchen sink area into a tidy, organized space.
Accurate measurements are crucial. Imagine building your tray only to find out it doesn’t fit. Avoid this frustration by taking precise measurements right from the start.
Remember a time you bought a piece of furniture that didn’t fit in your intended space? The disappointment is real. Don’t let that happen with your kitchen sink storage.
Gather Your Tools
Before you measure, gather a tape measure, a notepad, and a pencil. These tools will help you jot down dimensions accurately. Having everything ready saves time and keeps the process smooth.
A tape measure provides precise readings. A notepad and pencil help you record dimensions, so you don’t rely on memory.
Have you ever tried to remember a number but got it mixed up? Writing it down eliminates guesswork.
Measure The Sink Width
Start by measuring the width of your sink from one side to the other. This measurement will determine the maximum width of your storage tray. Ensure the tape measure is straight and not angled for accuracy.
Consider the lip of the sink. If your tray will rest on it, include this in your measurement. This ensures a snug fit without overhanging.
Have you ever crafted something only to realize a small oversight ruined the fit? Double-checking can prevent this.
Measure The Sink Depth
Next, measure the depth from the front to the back of the sink. This helps you determine how far your tray can extend without interfering with faucets or handles. A deep tray can offer more storage but must fit comfortably.
Consider the need for easy access to items stored in the tray. An overly deep tray might make it hard to reach items at the back.
Imagine reaching for a scrub brush and knocking over soap bottles. Proper depth measurement prevents such mishaps.
Account For Height Restrictions
Measure the vertical space available for the tray. Ensure there's enough room between the sink and any overhead obstacles like cabinets or shelves. This measurement helps in designing a tray that isn’t too tall.
A tray that’s too tall could limit access to items or make the area look cluttered. A well-proportioned tray enhances both aesthetics and utility.
Think about the times you’ve struggled to reach items stored too high or too low. Correct height measurements eliminate these struggles.
Consider Additional Features
Decide if you want any additional features like dividers or compartments in your tray. These features can affect the overall dimensions and functionality. Plan these details now to incorporate them smoothly into your design.
Dividers can help organize items like sponges and brushes. Compartmentalized trays keep everything in its place, reducing clutter.
How often have you searched for a small item in a mess of cleaning tools? Strategic features can make all the difference.
Once you have all your measurements, you’re ready to move on to building your kitchen sink storage tray. Accurate measurements are the foundation of a successful project. With the right dimensions, your tray will fit perfectly and meet your needs.
Cutting The Wood
Crafting kitchen sink storage trays involves carefully cutting wood for precise fit. Measure the space under your sink. Use a saw to cut wood to size. Sand the edges smooth. Assemble the pieces with screws. Then, apply a finish to protect the wood from moisture.
Cutting the wood is an essential step in creating efficient kitchen sink storage trays. This process requires precision and the right tools to ensure your trays fit perfectly and function optimally. With the right approach, cutting wood can be straightforward and rewarding. Let's dive into how you can achieve the best results.
Selecting Wood Type
Choosing the right type of wood is crucial for the durability and appearance of your storage trays. Pine is a popular choice for beginners due to its softness and ease of cutting. If you're looking for something more robust, oak offers strength and a beautiful grain pattern. Remember, the wood should be resistant to moisture, considering the proximity to your sink. What wood will fit your style and needs?
Tools For Cutting
Having the right tools makes cutting wood a breeze. A circular saw or table saw is ideal for making straight cuts with ease. If you prefer more control, a jigsaw is perfect for curved or intricate cuts. Don’t forget the measuring tape and pencil—accurate measurements ensure your trays fit like a glove. Have you ever tried using a handsaw for precision work? It could be a game-changer for those small, detailed cuts. As you prepare to cut your wood, always prioritize safety. Wearing protective gear such as goggles and gloves can prevent accidents. When I first started woodworking, I underestimated the importance of a clear workspace. It’s amazing how much smoother things go when you aren’t tripping over clutter. Ready to transform those wooden planks into something functional and beautiful?
Assembling The Tray
Building kitchen sink storage trays involves selecting durable materials and precise measurements. Arrange compartments thoughtfully to maximize space and functionality. Ensure easy access to frequently used items for efficient kitchen organization.
Assembling the tray for your kitchen sink storage is a straightforward yet rewarding task. It’s a practical project that not only improves your kitchen organization but also gives you a sense of accomplishment. Whether you’re a seasoned DIY enthusiast or a curious beginner, following a structured approach can make this process smooth and enjoyable.
Creating The Base
Start by selecting a sturdy piece of wood or a durable plastic sheet as your base. The material should be resistant to water since it will be near the sink. Measure the area under your sink to determine the exact dimensions needed for your tray. Cut the material to size using a saw or utility knife, ensuring clean, straight edges. If you’re using wood, sanding the edges will prevent any splinters. Seal the base with a waterproof finish to extend its lifespan. Do you have a favorite tool you always use for cutting? Choosing the right tool can make a big difference in the quality of your base.
Attaching The Sides
With the base ready, it’s time to attach the sides. This step is crucial for containing items and preventing them from sliding off. Use wood or plastic strips that match the height you desire for your tray. Align the strips with the edges of the base and secure them using screws or strong adhesive. If using screws, pre-drill the holes to avoid splitting the material. Make sure the corners are tightly joined to maintain the tray’s shape. Consider adding small rubber feet to the bottom of the tray. This simple addition can prevent slipping and protect the cabinet surface. Have you thought about the best way to align the sides before securing them? A little precision here ensures a perfect fit, transforming your tray into a reliable kitchen companion.
Finishing Touches
Building kitchen sink storage trays is a rewarding project. After assembling the basic structure, focus on the finishing touches. These details enhance the tray's appearance and durability. They ensure your trays stand the test of time. Let's explore the essential steps in this final phase.
Sanding The Edges
Smooth edges make a tray look polished. Use fine-grit sandpaper for best results. Gently sand all edges and corners. This helps prevent splinters and sharp edges. Check for any rough spots. Sand until the surface feels smooth to touch. Pay extra attention to corners and joints.
Applying A Finish
A good finish protects your tray. It also enhances its natural beauty. Choose a wood finish suitable for your needs. Clear varnish or wood stain are popular choices. Apply the finish with a brush or cloth. Ensure even coverage across all surfaces. Allow the finish to dry completely. Apply additional coats if needed. Each coat adds more protection and luster. Your storage tray is now ready for use!
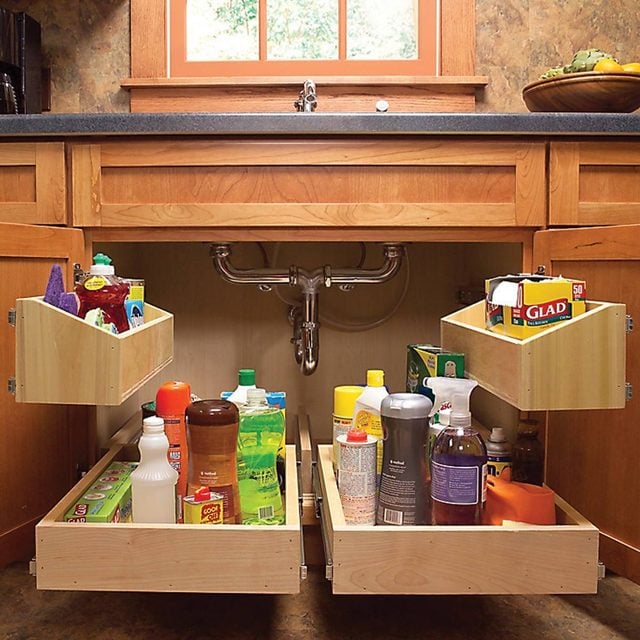
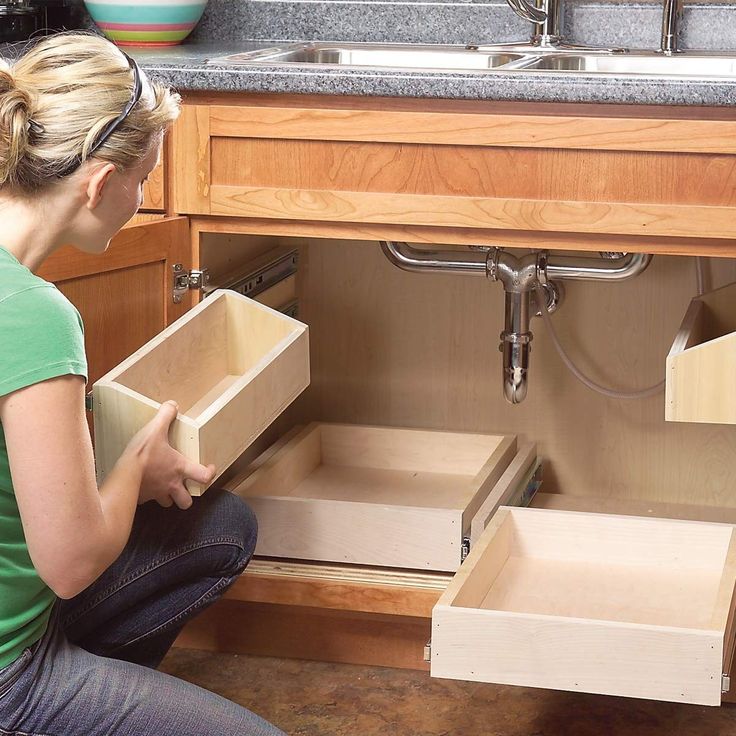
Installing The Trays
Organizing under-sink storage can transform kitchen functionality. First, measure space to fit trays. Ensure easy access to frequently used items. Slide trays in for efficient use.
Once you've crafted the perfect kitchen sink storage trays, it's time to install them. This step is crucial as it ensures your trays function seamlessly and efficiently. Proper installation can transform your under-sink chaos into an organized oasis. Let's delve into the details of how you can position and secure your trays for optimal use.
Positioning Under The Sink
Begin by assessing the space under your sink. This area often has pipes and other obstacles, so careful positioning is key. Measure the height and width to ensure your trays fit comfortably without hindering plumbing. Think about how you use your under-sink space. Do you need easy access to cleaning supplies or more storage for dish towels? Position the trays so that they cater to your daily needs. This way, every item will have a designated spot, minimizing clutter.
Securing With Fasteners
Once positioned, it's time to secure your trays. Use sturdy fasteners to ensure they stay in place. Screws and brackets are ideal for a more permanent solution, providing a robust hold. For those who prefer flexibility, consider adhesive fasteners. They offer a less permanent attachment but still provide security. Remember to check the weight capacity of your chosen fasteners to avoid mishaps. Why not make this a fun family project? Involve your kids or partner in the installation process. It's a great way to teach them about organization and responsibility. Plus, it can turn a mundane task into a bonding experience. Have you considered the satisfaction of pulling out a perfectly organized tray every morning? With these installation steps, you can achieve that sense of calm and efficiency.
Credit: www.pinterest.com
Maintenance Tips
Creating kitchen sink storage trays can maximize space efficiently. Use waterproof materials for durability, ensuring easy cleaning and maintenance. Customize tray sizes to fit under-sink areas, allowing for organized storage of cleaning supplies and kitchen essentials.
Maintaining your kitchen sink storage trays ensures they remain functional and appealing over time. You’ve put effort into building these trays, so keeping them in top condition is vital. Here’s how you can do that effectively, ensuring they last for years to come.
Regular Cleaning
Regular cleaning keeps your storage trays looking new. Wipe them down with a damp cloth weekly to remove any crumbs or spills. A mild soap solution can help tackle tougher stains.
Avoid Excess Moisture
Excess moisture can damage your trays over time. Make sure the trays are dry after cleaning. If they get wet during use, wipe them down immediately to prevent warping or mold growth.
Check For Wear And Tear
Check for any signs of wear and tear periodically. Look for cracks or loose joints that might need fixing. Addressing these issues promptly can prevent bigger problems later.
Use Protective Liners
Protective liners can shield your trays from scratches and stains. They are easy to replace and can extend the life of your trays. Consider using non-slip liners to keep items in place and protect the tray surface.
Organize Regularly
Take time to reorganize the contents of your trays occasionally. This can prevent overcrowding and make it easier to find things. Plus, it’s a great way to keep your kitchen tidy and efficient.
Reapply Finish
If your trays have a wooden finish, reapply a sealant or polish every year. This keeps the wood looking vibrant and protects against moisture and wear. A simple polish can make a significant difference in appearance and durability. Consistent care of your storage trays not only extends their lifespan but also keeps your kitchen looking neat. How will you ensure your kitchen sink storage trays stay in pristine condition?

Credit: www.pinterest.com
Frequently Asked Questions
What Materials Are Needed For Sink Trays?
To build kitchen sink storage trays, you'll need waterproof plywood, wood glue, screws, and a sealant. Choose durable materials to withstand moisture. Consider adding non-slip liners for safety. Gather basic tools like a saw, drill, and measuring tape to ensure precise construction.
Always prioritize quality materials for longevity.
How Do I Measure Sink Tray Dimensions?
Start by measuring your sink's width and depth accurately. Add extra space for easy tray removal. Consider your storage needs and adjust dimensions accordingly. Ensure trays fit snugly but allow easy access. Use a measuring tape and record dimensions for reference during construction.
Accurate measurements are crucial.
Can I Customize Sink Storage Trays?
Yes, customizing sink storage trays is possible. You can adjust size, shape, and compartments according to your needs. Add dividers for better organization. Use paint or varnish to match your kitchen decor. Personalization enhances functionality and aesthetics. Tailor the trays to fit your specific storage requirements.
What Tools Are Required For Tray Assembly?
For assembling kitchen sink storage trays, you'll need a saw, drill, screwdriver, and measuring tape. Sandpaper helps smooth edges. Use clamps for stability during assembly. Basic woodworking tools ensure precise cuts and secure connections. Gather all necessary tools beforehand to streamline the construction process.
Conclusion
Creating kitchen sink storage trays is simple and rewarding. These trays maximize space. They keep your kitchen organized. No more clutter around the sink. Just a clean, tidy area. You can customize trays to fit your needs. Use different materials and colors.
Make your kitchen unique. These trays are practical and stylish. Perfect for any home. Start building your own trays today. Enjoy a more organized kitchen tomorrow.