Have you ever found yourself wishing for extra storage in your kitchen, but you're simply out of space? Imagine having a stylish bench that not only offers a cozy spot for morning coffee but also cleverly hides your kitchen clutter.
Building a bench with storage might sound like a complex project, but with the right guidance, it's a rewarding task that can transform your kitchen space. This guide will walk you through the process, showing you how to create a functional piece that fits your style and needs.
You'll discover that with some basic tools and materials, your dream kitchen bench is within reach. Let’s unlock the secret to maximizing your kitchen space while adding a personalized touch. Keep reading to learn how to craft this perfect blend of practicality and design for your home.
Planning Your Bench Design
Designing a bench with storage for your kitchen adds both function and style. Consider the size and layout of your space. Choose materials that match your kitchen’s theme, ensuring durability. Focus on creating accessible storage compartments to keep your kitchen organized and clutter-free.
Planning Your Bench Design Creating a bench with storage for your kitchen is an exciting project that can transform your space. It's not just about adding functionality; it's about crafting a piece that complements your kitchen's style and serves your specific needs. As you embark on this DIY journey, consider planning your bench design thoughtfully. Think about how you want your kitchen to look and feel when the bench is complete. This planning stage is crucial to ensure your bench fits seamlessly into your kitchen environment.
Choosing The Right Dimensions
Start by assessing the space where the bench will sit. Measure the area carefully, ensuring you account for any surrounding furniture or obstacles. Ask yourself, how much seating do you need? If you often entertain guests, a longer bench might be ideal. Remember, the depth and height should be comfortable for sitting and storage access. A well-sized bench can enhance the flow of your kitchen, making it both practical and inviting.
Selecting Materials
Materials play a significant role in the durability and aesthetics of your bench. Consider what suits your kitchen's theme. Wood is a popular choice for its warmth and versatility. If you're looking for something easy to clean, try laminate or metal. Don't forget to consider the weight of the materials, especially if you plan to move the bench occasionally. You want a balance of sturdiness and style that reflects your personality and the demands of your kitchen. What kind of vibe are you aiming for? A rustic wooden bench can add charm, while sleek metal can provide a modern edge. Your choice of materials will speak volumes about your taste and how you use your kitchen.

Credit: www.reddit.com
Gathering Necessary Tools
Gathering the necessary tools is crucial for building a bench with storage for the kitchen. Essential items include a saw, screwdriver, and measuring tape. With these basic tools, the assembly process becomes straightforward and efficient.
Building a bench with storage for your kitchen can be a rewarding project. Imagine having a stylish piece that offers both seating and extra space for your kitchen essentials. But before you start, gathering the right tools is crucial. This step sets the foundation for a smooth and successful building process. Having the right tools ensures precision and makes your DIY journey enjoyable. Let's explore what you need to get started.
Essential Carpentry Tools
First, let's talk about the basic carpentry tools you'll need. A tape measure is a must-have to ensure your bench fits perfectly in your kitchen space. You’ll also need a saw for cutting wood to the desired size. A drill will be your best friend when joining the pieces together. Make sure you have a screwdriver set; it’s essential for securing screws tightly. Don't forget a hammer for any nails that need a little persuasion. Do you have a square? It's perfect for checking angles and ensuring your bench is stable. You might also want to use a level to avoid the dreaded wobbly bench. What tools do you already own, and what might you need to borrow or purchase?
Safety Gear Checklist
Safety should never take a back seat in any DIY project. Protect your eyes with safety goggles to prevent any wood chips from causing harm. Gloves are important for protecting your hands from sharp edges and splinters. Consider wearing a dust mask, especially when cutting or sanding wood, to avoid inhaling particles. Ear protection is wise if you’re using loud power tools. Have you ever found yourself skipping safety gear because it seems inconvenient? The small effort to gear up can save you from a lot of trouble later. Gathering your tools and safety gear before starting makes the process smoother and more enjoyable. You're now equipped to dive into creating a functional and stylish kitchen bench with storage. Are you ready to transform your kitchen space?
Preparing The Workspace
Creating a bench with storage for your kitchen can be a rewarding project. It combines functionality with style, enhancing your kitchen space. The first step is preparing the workspace. A well-organized workspace ensures efficiency and safety during the build. Let's explore how to set up your workspace effectively.
Clearing The Area
Start by clearing the area where you'll work. Remove any unnecessary items. Ensure the space is free of clutter. This makes room for your materials and tools. You'll need enough space to move around comfortably. A clean area also reduces the risk of accidents. Sweep the floor to remove any debris. This creates a safe environment for your project.
Setting Up Workstations
Next, set up dedicated workstations. Designate areas for cutting, assembling, and storing materials. Keep your tools within easy reach. Arrange your materials in an organized manner. This helps you find what you need quickly. Use a sturdy table or workbench for cutting and assembling. Ensure it's stable and at a comfortable height. Proper lighting is essential. Good lighting reduces eye strain and helps with precision.
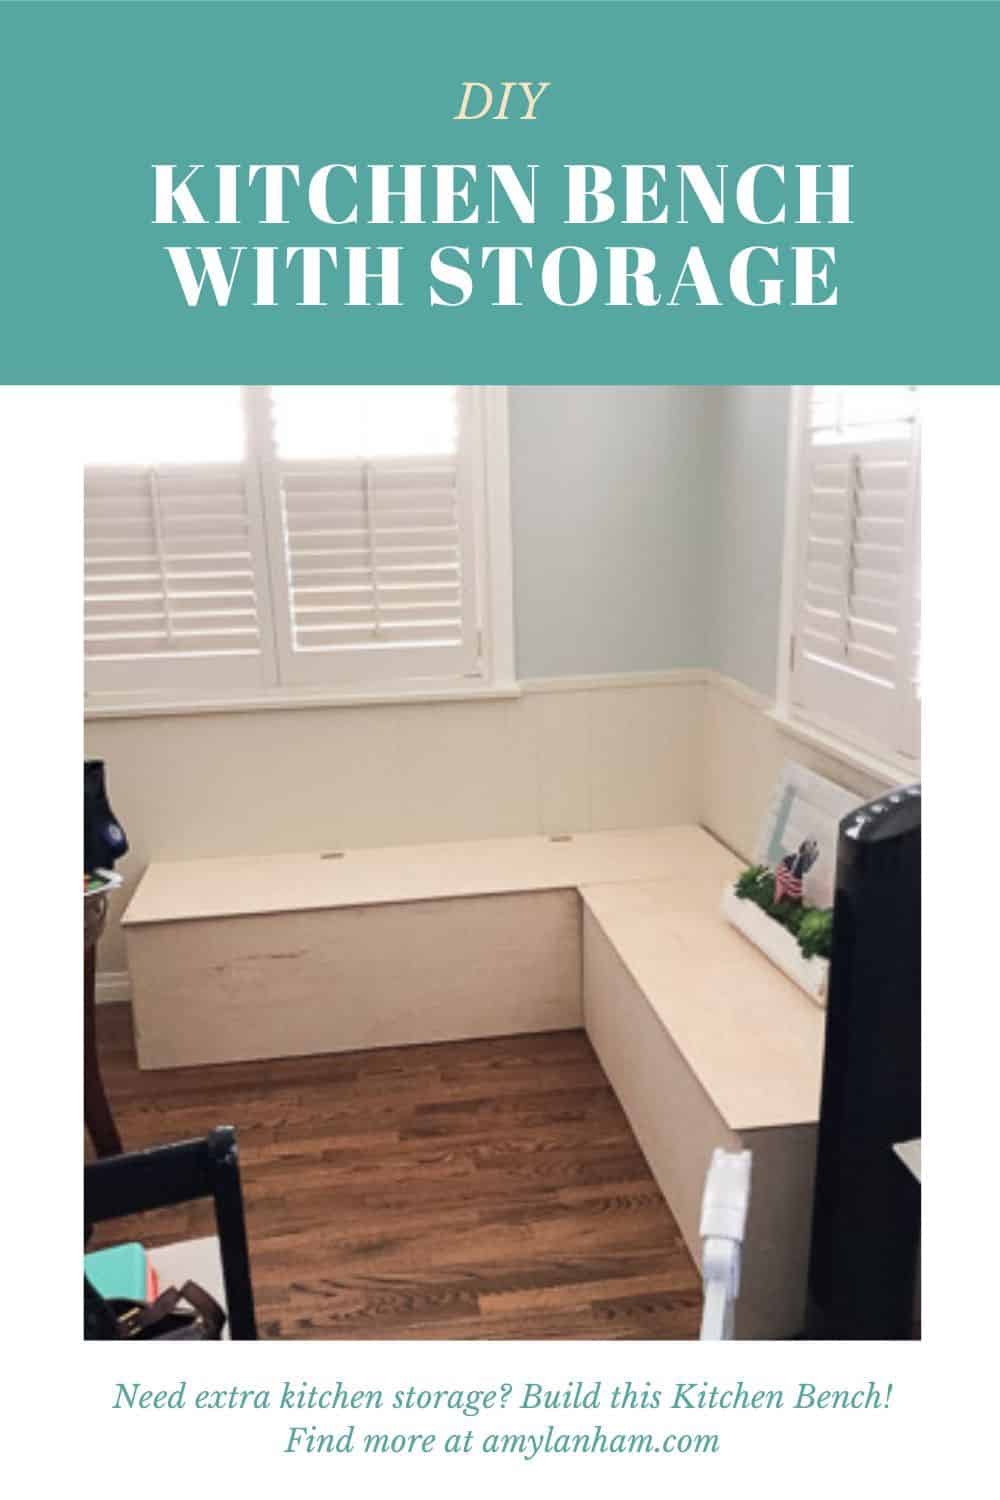
Credit: amylanham.com
Cutting And Preparing Wood
Creating a kitchen bench with storage requires precise woodwork. Start by cutting and preparing your wood pieces carefully. This ensures a sturdy and durable bench. Proper preparation also enhances the appearance and functionality of your storage bench.
Measuring And Marking
Begin by measuring your wood with a tape measure. Accurate measurements are crucial for a perfect fit. Use a pencil to mark your cuts clearly. These marks guide your cutting process. Double-check measurements to avoid mistakes.
Using Power Tools Safely
Wear safety goggles and gloves when using power tools. They protect your eyes and hands from debris. Ensure your workspace is clean and organized. This minimizes accidents. Use a saw to cut along your marked lines. Maintain a steady hand for straight cuts. Always turn off tools after use. Safety should always come first.
Assembling The Bench Frame
Building a bench with storage is a rewarding project. The bench frame is the backbone. A strong frame ensures durability and function. Pay attention to details. This guide simplifies the process.
Joining Techniques
Joining techniques are crucial for a sturdy bench. Use screws for a secure hold. Nails can add extra stability. Consider wood glue for added strength. Choose the right technique for your materials. Some woods require specific methods.
Ensuring Stability
Stability is key in a storage bench. Start by measuring carefully. Make sure all pieces fit snugly. Reinforce joints with brackets if needed. Check your work as you go. A stable bench will serve you for years.
Creating Storage Compartments
Building a bench with storage for the kitchen maximizes space and adds functionality. Start by selecting durable materials and design a sturdy frame. Add compartments underneath for organizing kitchen essentials like pots, pans, and small appliances.
Creating storage compartments in your kitchen bench can transform a simple seating area into a multifunctional space. Imagine having a cozy nook that not only provides comfort but also helps you store your kitchen essentials neatly. This makes your kitchen tidier and more efficient. Plus, it adds a personal touch to your home. Let's explore how you can design and install these compartments to maximize both style and utility.
Designing The Layout
The first step in creating storage compartments is designing the layout. Think about what you need to store—pots, pans, or maybe your kids' coloring books? This will guide how you section off your bench. Measure the available space accurately. Consider the depth and width for each compartment. You don't want to end up with a space too small for your storage bins. Sketch a simple plan. This doesn’t need to be fancy—just a basic outline of where each compartment will go. Use graph paper or a digital tool to visualize your ideas clearly.
Installing Dividers
Once your layout is ready, it's time to install dividers. These are crucial for separating items and keeping everything organized. Wooden or metal dividers are popular choices. Secure the dividers firmly. Use screws or brackets to ensure stability. A wobbly divider won't hold up well over time, especially with heavy items. Adjust the dividers to fit your needs. Maybe you want adjustable dividers that can be repositioned as your storage needs change. This flexibility can be a game-changer for dynamic households. Creating storage compartments in your kitchen bench is a rewarding project. It not only enhances your kitchen's functionality but also adds a personal flair. What will you store in yours?
Attaching The Bench Top
Attaching the bench top is a simple step in building a storage bench for the kitchen. Secure the top using screws and brackets, ensuring it fits snugly and opens smoothly. This creates a functional and stylish addition to your kitchen space.
Attaching the bench top to your storage kitchen bench is a crucial step that determines both the functionality and the aesthetic appeal of your project. This is where your creativity meets precision, ensuring that your bench top not only looks great but also stands the test of time. Whether you're a seasoned DIY enthusiast or a beginner, this part of the process can be quite rewarding. Let's explore how you can make this step seamless and efficient.
Securing The Surface
Start by ensuring that the bench top aligns perfectly with the base. Use a measuring tape to double-check the dimensions. This prevents any awkward overhangs or mismatched edges. Once aligned, utilize strong wood screws to fasten the top securely. Drill pilot holes to avoid splitting the wood, which is a common mishap if skipped. Tighten the screws just enough to hold the top firm without causing any damage. Consider adding a drop of wood glue for extra stability. This acts as a backup to the screws, especially if you're planning to store heavier items in the bench. Remember to wipe off any excess glue to maintain a clean finish.
Smoothing The Edges
After securing the top, it's time to smooth the edges. This step not only enhances the look but also ensures safety, especially if you have children. Sharp edges can be hazardous. Use a fine-grit sandpaper to gently round off the corners and edges. The key is to maintain consistent pressure to avoid uneven surfaces. You might be surprised how this simple step can transform the overall feel of your bench. Finish by wiping the surface with a damp cloth to remove any dust particles. This prepares the bench for any finishing touches, like staining or painting, giving it a polished and professional appearance. Crafting a bench with a storage kitchen doesn’t just add functionality to your space. It also offers an opportunity to inject personal style into your home. How will you make your bench uniquely yours?

Credit: makingitwithabby.com
Finishing Touches
Building a bench with storage can enhance your kitchen space. Include paint or cushions for a cozy feel. Add decorative handles for easy access and visual appeal.
When you’re building a bench with storage for your kitchen, the finishing touches are what truly transform your project from a simple DIY to a standout piece in your home. These details can elevate the functionality and aesthetic appeal of your creation. Let’s dive into some crucial steps that will help you achieve a professional-looking finish.
Sanding And Polishing
Before you apply any paint or varnish, give your bench a smooth surface. Sanding is the key to a flawless finish. Use medium-grit sandpaper to smooth out any rough edges or uneven surfaces. This step ensures your paint or varnish adheres properly and looks even. Once sanded, take a moment to polish the surface with fine-grit sandpaper. This will help in bringing out the natural grain of the wood and eliminate any remaining imperfections. You’ll feel a sense of accomplishment as the wood transforms under your touch.
Applying Paint Or Varnish
Choosing between paint or varnish depends on the look you want to achieve. If you prefer a sleek and colorful finish, opt for paint. Choose a color that complements your kitchen decor. Apply two coats for a lasting finish, allowing each layer to dry thoroughly. For those who love the natural look of wood, varnish is your best friend. It not only enhances the wood’s natural beauty but also provides protection. Apply a clear varnish in thin layers, letting each coat dry before adding the next. This process ensures a durable finish that will withstand the wear and tear of daily kitchen use. Have you ever wondered why some DIY projects look more professional than others? The secret often lies in the details of these finishing steps. Taking your time with sanding and selecting the right finish can make all the difference in the world. What kind of finish are you imagining for your bench?
Adding Cushions And Decor
Adding cushions and decor can transform a storage kitchen bench. It enhances comfort and brings style. Whether you're creating a cozy nook or a vibrant space, the right choices make all the difference.
Choosing Comfortable Cushions
Consider the cushion material first. Cotton is soft and breathable. Polyester is durable and easy to clean. Thickness matters too. Thick cushions offer more comfort. Choose colors that complement your kitchen theme. Neutral tones blend with most decor. Bright colors add a pop of personality.
Enhancing Aesthetics
Decorative pillows can add charm. Mix patterns and solids for visual interest. Use throws for an added layer of comfort. Wall art can enhance the bench area. Hang pictures or prints above the bench. Greenery brings freshness. Place small plants or succulents nearby. Choose decor that suits your style.
Maintenance Tips
Keeping your bench with storage in good shape is essential. Regular maintenance ensures it stays functional and beautiful. In this section, you'll find tips to help maintain your bench effectively. Learn how to clean it properly. Understand how to fix minor damages. These steps will prolong your bench's life.
Cleaning And Care
Dust your bench weekly with a soft cloth. This prevents dirt buildup. For deeper cleaning, use a mild soap and water solution. Avoid harsh chemicals that may damage the surface. Dry the bench thoroughly after cleaning to prevent moisture damage. Consider using furniture polish to enhance the wood’s finish. This adds a protective layer and shine.
Repairing Minor Damages
Inspect your bench regularly for signs of wear. Small scratches can be fixed with wood filler. Choose a filler that matches your bench's color. Apply it gently with a putty knife. Sand the area smoothly once the filler dries. For loose screws or hinges, tighten them using a screwdriver. If a part is broken, replace it promptly to prevent further damage. This keeps your bench sturdy and safe for use.
Frequently Asked Questions
How To Choose Wood For Kitchen Bench?
Select hardwoods like oak or maple for durability. Avoid softwoods that may warp or dent over time. Choose treated wood for moisture resistance, especially in kitchen environments. Consider the wood's finish to match your kitchen aesthetics. Ensure the wood is sustainably sourced for an eco-friendly choice.
What Tools Are Needed For Building A Bench?
You'll need a saw, drill, and screwdriver. Use a tape measure for accuracy. Sandpaper ensures a smooth finish. Clamps keep pieces stable during assembly. Consider safety gear like gloves and goggles. A sander may be needed for larger projects. Have a pencil handy for marking measurements.
How To Add Storage To A Kitchen Bench?
Incorporate drawers or cubbies beneath the seating area. Use baskets for easy access and organization. Install sliding panels for hidden storage. Consider adjustable shelves for flexible use. Ensure storage doesn't compromise seating comfort. Optimize space by using vertical storage solutions.
Use durable materials for long-lasting functionality.
Can Beginners Build A Storage Bench?
Yes, beginners can build a storage bench with basic tools. Follow detailed guides or video tutorials for step-by-step instructions. Start with simple designs and gradually try complex projects. Ensure proper measurements and use pre-cut wood to simplify the process. Seek help from experienced builders if needed.
Conclusion
Building a bench with storage transforms your kitchen space. It's practical and stylish. You get extra seating and storage in one. Choose your materials wisely for durability. Follow our guide step by step. Personalize your bench to fit your kitchen's style.
Organize better with hidden storage. Enjoy meals and conversations comfortably. A bench like this adds value to any home. Plus, it's a fun DIY project. Gather your tools, start building today. Your kitchen deserves this functional upgrade. You'll love the results.
A cozy kitchen corner awaits!