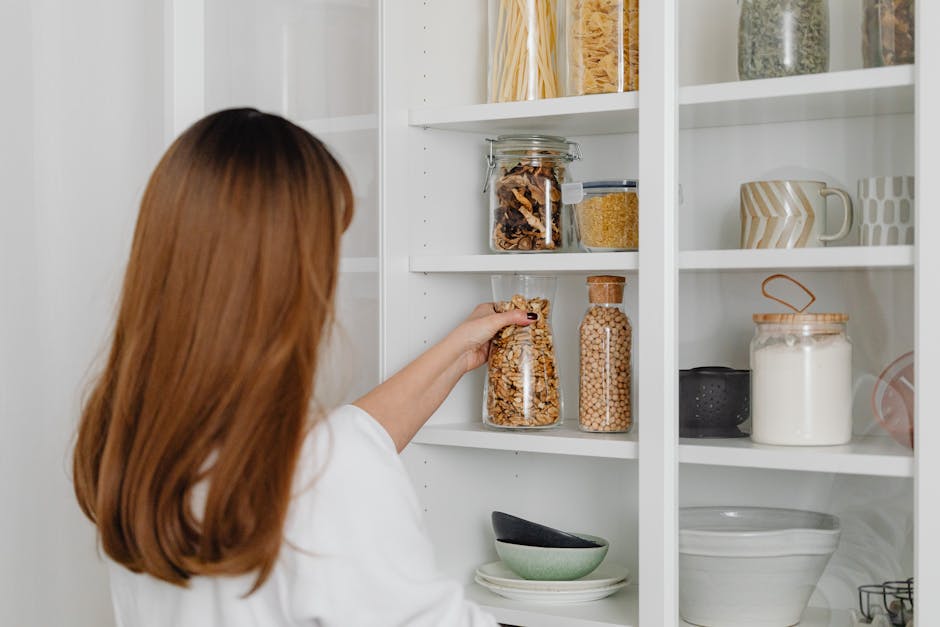

Have you ever found yourself struggling to fit all your kitchen essentials into limited cabinet space? You're not alone.
Many of us dream of a clutter-free kitchen, where every pot, pan, and gadget has its own perfect spot. Imagine the satisfaction of opening your cabinets and instantly finding what you need, without the frustration of digging through a chaotic mess.
In this guide, you will discover how to build your very own storage cabinet tailored to your kitchen needs. Whether you're a DIY enthusiast or a beginner, this step-by-step process will empower you to create a functional and stylish storage solution. Plus, you'll save money and gain the rewarding experience of crafting something with your own hands. Get ready to transform your kitchen into an organized haven, where everything is just an arm's reach away.
Choosing The Right Materials
Selecting the right materials is crucial for kitchen storage cabinet construction. Wood offers durability and warmth, while metal provides strength and modern style. Opt for moisture-resistant materials to ensure long-lasting use in a kitchen environment.
Choosing the right materials for your kitchen storage cabinet can make all the difference between a sturdy and stylish piece or a wobbly eyesore. Your materials can influence not just the look and feel of your cabinet, but also its longevity and functionality. Let's dive into some practical insights to help you pick the best materials for your kitchen cabinet project.
Understanding Your Budget
Your budget will often dictate the materials you can choose. High-end woods like oak or cherry might be beautiful, but they can also be expensive. On the other hand, engineered woods like MDF (Medium Density Fiberboard) can be cost-effective and versatile. Consider how much you're willing to spend and where you might want to splurge or save. A smart balance could be investing in quality wood for the cabinet doors and using MDF for the internal shelving.
Prioritizing Durability
Durability is key when building kitchen storage cabinets. Your kitchen is a high-traffic area, and the cabinet needs to withstand daily wear and tear. Plywood is a strong option that resists warping, making it perfect for the humid kitchen environment. Its layered construction offers strength without the hefty price tag of solid wood. Do you want a cabinet that stands the test of time? Durability should be your priority.
Assessing Aesthetics
While functionality is crucial, aesthetics can’t be ignored. Your kitchen cabinet should complement your kitchen's style. Solid wood offers a timeless look and can be stained to match other kitchen elements. If you prefer a modern touch, consider a sleek laminate finish. Picture your dream kitchen—what style do you want your cabinet to reflect?
Evaluating Maintenance Needs
Maintenance is another factor to consider. Some materials require regular upkeep to maintain their appearance and functionality. Solid wood, for example, might need periodic refinishing, while laminate is more low-maintenance. Think about how much time you have for upkeep. Are you ready for a high-maintenance relationship with your cabinet, or do you prefer something less demanding?
Considering Environmental Impact
Finally, think about the environmental impact of your material choices. Sustainable materials like bamboo or reclaimed wood can be eco-friendly options. Would you like your project to be kind to the planet? Opting for sustainable materials can be a rewarding choice that aligns with your values. In choosing the right materials, balance your budget, durability, aesthetics, maintenance needs, and environmental impact. This thoughtful approach ensures your kitchen cabinet is a joy to build and a pleasure to use.
Essential Tools
Building a storage cabinet for your kitchen is a rewarding task. It requires a few essential tools to get started. These tools ensure precision and efficiency. Having the right tools makes the process smoother and more enjoyable. Let's delve into the must-have tools for building a sturdy kitchen cabinet.
Measuring Tape
A measuring tape is crucial for accuracy. It helps determine the dimensions of your cabinet. Precise measurements ensure a perfect fit. This tool prevents errors and saves time.
Drill
A drill is essential for making holes. It's used for screws and hinges. A cordless drill provides ease of movement. Choose one with adjustable speed for versatility.
Level
A level ensures your cabinet is straight. It helps avoid slanted shelves. This tool is vital for maintaining balance. A balanced cabinet looks neat and professional.
Hammer
A hammer is needed for securing nails. It's useful for assembling different parts. Choose a lightweight hammer for easy handling. It helps in fastening components firmly.
Saw
A saw is required for cutting wood. Choose a saw based on your material. A circular saw is ideal for larger pieces. It ensures smooth and precise cuts.
Screwdriver
A screwdriver is used to tighten screws. It helps in assembling the cabinet. Choose one with a comfortable grip. This tool is necessary for securing parts.
Square
A square helps in checking angles. It ensures your corners are perfect. This tool aids in achieving symmetry. A symmetrical cabinet enhances visual appeal.
Sander
A sander smooths out rough edges. It prepares the surface for painting or staining. Choose an electric sander for efficiency. This tool ensures a polished finish.
Clamps
Clamps hold pieces together during assembly. They ensure stability while gluing or screwing. Choose adjustable clamps for flexibility. This tool is essential for sturdy construction.
Designing The Cabinet
Crafting a kitchen storage cabinet involves selecting sturdy materials and measuring space for optimal fit. Assemble pieces carefully, ensuring stability and ease of use. Paint or stain for a finish that complements your kitchen decor.
Designing a storage cabinet for your kitchen involves creativity and planning. A well-designed cabinet enhances kitchen organization. It adds style to your cooking space. Start by understanding your kitchen's needs. Then, create a design that fits both function and aesthetics. Two key steps in this process are measuring your space and sketching the layout.
Measuring Space
Accurate measurements are crucial for your cabinet design. Use a measuring tape to determine the available space. Measure the width, height, and depth. Note any obstructions like pipes or outlets. This ensures the cabinet fits perfectly. Consider the surrounding furniture and appliances. Leave enough space for doors and drawers to open. Proper measurements prevent costly mistakes.
Sketching The Layout
Sketching helps visualize your cabinet design. Use graph paper or a digital tool. Draw a basic outline of your kitchen space. Include windows, doors, and existing fixtures. Decide on the cabinet's shape and size. Will it be tall or short? Will it have open shelves or closed doors? Experiment with different layouts. Try various configurations to find the best fit. This step helps refine your design before building begins.
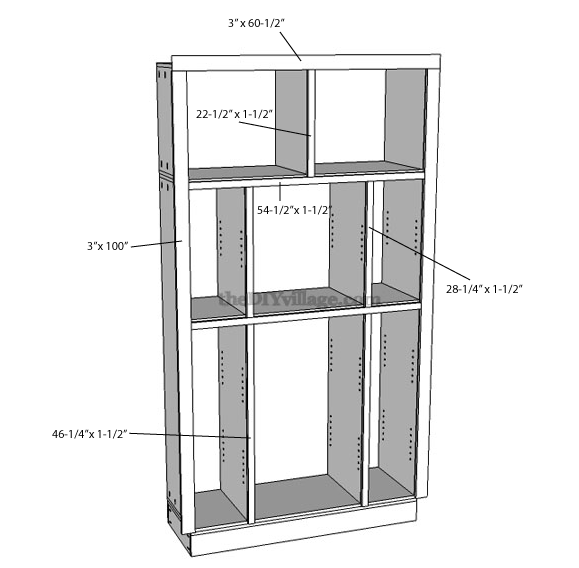
Credit: www.thediyvillage.com
Cutting The Wood
Building a storage cabinet for your kitchen begins with cutting the wood. This step is crucial for ensuring your cabinet fits perfectly. Precise cuts make the assembly process smoother. You need the right tools and a clear plan.
Preparing The Panels
First, gather your wood panels and measure them carefully. Mark the dimensions with a pencil. Ensure each panel is correctly sized for your cabinet design. Use a circular saw for straight cuts. This tool provides clean, accurate edges. Double-check measurements before cutting. Mistakes in this stage can lead to problems later.
Smoothing The Edges
After cutting, focus on smoothing the edges. Rough edges can cause splinters. Use sandpaper or an electric sander for this task. Start with coarse grit sandpaper. It removes larger imperfections. Then, switch to fine grit for a smooth finish. This step improves the cabinet's appearance. It also makes the panels safer to handle.
Assembling The Frame
Building the frame forms the backbone of your kitchen storage cabinet. Start by cutting wood pieces to fit the design. Secure them together using screws, ensuring each corner aligns perfectly for stability.
Assembling the frame of your kitchen storage cabinet is a rewarding task that brings your DIY project to life. This step sets the foundation for a sturdy and functional cabinet. You'll find that with careful attention and a bit of patience, creating a reliable frame is entirely within your reach.
Joining The Panels
Begin by laying out your side and bottom panels on a flat surface. Ensure that all edges align perfectly. A small mistake here can lead to a wobbly structure later. Use wood glue along the edges where the panels meet. This provides an initial hold, ensuring the panels stay in place while you work. Have you ever noticed how a little glue can make such a big difference? Once glued, secure the panels with clamps to prevent any movement. Allow them to dry for at least 30 minutes. During this time, double-check that everything remains aligned.
Securing The Structure
With the panels joined, it's time to reinforce the structure. Use screws to provide additional strength to the corners. This step is crucial for long-term durability. Drill pilot holes before inserting the screws. This helps prevent wood from splitting, ensuring a clean, professional finish. Have you ever skipped this step and regretted it? A small effort here saves you a lot of trouble. Finally, check the frame by giving it a gentle shake. It should feel solid, with no movement or creaks. If it does, tighten the screws and confirm the joints are secure. As you assemble the frame, remember that each step is important. Your attention to detail now will pay off with a cabinet that stands the test of time. Are you ready to see your kitchen transform with a storage solution that you built yourself?
Building The Shelves
Crafting kitchen storage cabinets involves selecting sturdy materials and precise measurements. Assemble shelves by securing them with screws and brackets. Use a level to ensure stability and even alignment.
Building the shelves in your kitchen storage cabinet can seem like a daunting task, but with a bit of planning and some basic tools, you'll find it's a manageable project. A well-organized shelving system can transform your kitchen space, making it more functional and aesthetically pleasing. Whether you’re a seasoned DIY enthusiast or a beginner, creating sturdy and practical shelves is within your reach.
Determining Shelf Placement
First, take a moment to consider what items you'll store. Will they be heavy pots and pans or light cereal boxes? This will influence the strength and spacing of your shelves. Measure the height and width of your cabinet interior. Use these measurements to determine how many shelves you can fit. Remember to allow enough space between each shelf for easy access to your items. If you love efficiency, think about adjustable shelving. This allows you to rearrange shelf height based on changing storage needs. You might find it surprising how often needs shift over time.
Installing The Shelves
Gather your tools: a drill, screws, a level, and shelf brackets. Secure the brackets to the interior sides of the cabinet where you’ve marked your shelf placement. Make sure they’re level to avoid wobbly shelves. Cut your shelves from a sturdy material like plywood or MDF. If you're using adjustable shelving, install the shelf pins first and rest your cut boards on them. Test the stability by placing a few items on each shelf. Does everything feel secure? If a shelf wobbles, double-check your bracket alignment and tighten the screws. Have you considered adding a coat of paint or stain to your shelves? Not only does it enhance the appearance, but it also adds a layer of protection. Taking these extra steps can extend the life of your newly built shelves. Building your own kitchen storage cabinet shelves is a rewarding project. With each step, you gain skills and confidence. What will you build next?
Attaching The Doors
Attaching the doors to your kitchen storage cabinet can be exciting. This step brings your project closer to completion. A well-attached door ensures functionality and enhances your kitchen's look. Let's dive into aligning the hinges and securing the doors.
Aligning The Hinges
First, gather all necessary tools. You'll need a drill, screws, and a measuring tape. Measure the distance from the top and bottom of the cabinet. Mark these spots on the cabinet frame. This is where your hinges will go. Make sure the marks are even. Uneven marks can cause misalignment.
Next, attach the hinges to the door. Align them with the previously marked spots. It's crucial that they sit flush against the door's edge. Use a drill to secure the hinges with screws. Check that the hinges are level. An unlevel hinge can cause doors to swing awkwardly.
Securing The Doors
Position the door against the cabinet frame. Ensure it aligns with the cabinet edges. Hold the door in place while you fix the hinges to the cabinet. This may require an extra pair of hands. Secure each hinge with screws, starting from the top. Move to the bottom hinge next.
Once the door is attached, test its movement. Open and close it several times. Adjust if it doesn't swing smoothly. Tighten any loose screws. If the door drags or sticks, adjust the hinge position slightly. This ensures proper alignment and smooth operation.
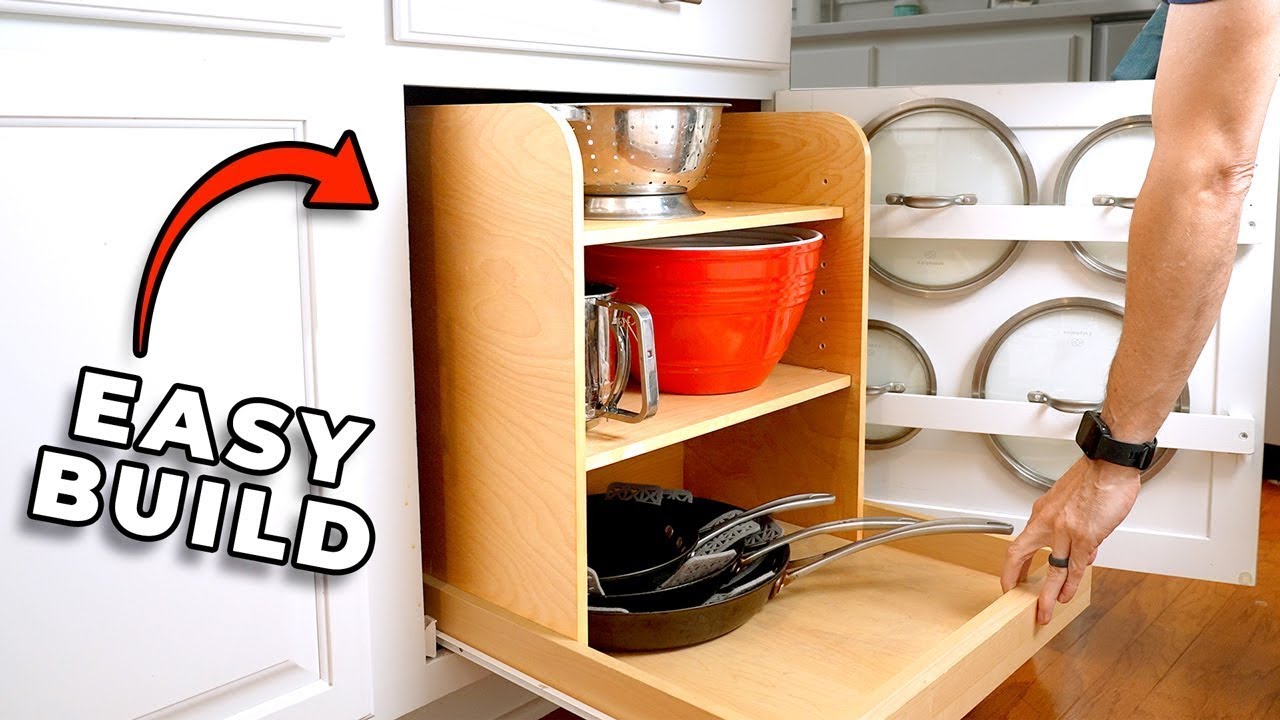
Credit: www.youtube.com
Finishing Touches
Adding finishing touches to your kitchen storage cabinet enhances its appeal. Sand the surfaces for a smooth finish. Apply a coat of paint or varnish that complements your kitchen decor.
Adding the final touches to your kitchen storage cabinet is like putting the cherry on top of a sundae—it’s the small details that can make a big difference. You've spent time carefully crafting your cabinet, and now it's time to give it the perfect finish. These steps will not only enhance the look but also protect your masterpiece, ensuring it serves you well for years.
Sanding And Smoothing
Before you think about color or sheen, it's crucial to prepare your cabinet's surface. Grab a piece of fine-grit sandpaper and gently sand all exposed areas. Sanding removes any rough spots and helps the finish adhere better. Make sure to wipe down the cabinet with a damp cloth after sanding. This will remove the dust and give you a clean slate to work with. A smooth surface is your best friend for a flawless finish. Have you ever noticed paint or varnish peeling off? Often, this happens because of poor preparation. Taking the time to sand now can save you from frustration later.
Applying Paint Or Varnish
Once your cabinet is smooth, it's time to decide how you want it to look. Paint offers a variety of colors that can match your kitchen's theme. If you prefer a natural look, varnish can enhance the wood's grain and add a warm glow. Use a high-quality brush or roller for even application. Start with a thin coat, let it dry, and then apply a second one if needed. This layering ensures a rich, even finish without drips or streaks. Think about the environment your cabinet will be in. Is it a humid kitchen? You might want to consider a waterproof sealant to protect your work. These small decisions can have a big impact on durability. Have you ever painted something only to see it chip away? A good primer can prevent this by allowing the paint or varnish to stick better. Remember, a little patience goes a long way in achieving a professional look. As you complete these finishing touches, take a step back and admire your handiwork. How does it feel to see a project come together? Embrace the satisfaction of creating something both beautiful and functional for your kitchen.
Installing The Cabinet
Building a kitchen storage cabinet involves measuring space, cutting wood, and assembling parts. Use screws to secure shelves and doors. Paint or stain for a clean finish.
Installing a cabinet in your kitchen can transform your space, adding both functionality and aesthetics. But where do you start when it comes to putting it in place? This section will guide you through the essential steps of positioning and securing your cabinet. By focusing on these aspects, you’ll ensure your cabinet not only looks great but is safe and stable for everyday use. Positioning in the Kitchen Where you position your cabinet can make a world of difference. Think about how you'll use it daily. Is it for storing pots and pans, or perhaps pantry items? Consider the workflow of your kitchen. You want your cabinet to be within easy reach of your cooking area, without obstructing movement. Measure your space carefully. Double-check the dimensions of both your cabinet and the designated area. You don't want any surprises when you realize your cabinet doesn't fit as expected. Visualize the placement. Sometimes, it helps to mark the floor with tape to outline the cabinet's footprint. This can give you a better idea of how it will look and function in your kitchen. Securing to the Wall Once you've decided on the perfect spot, securing your cabinet to the wall is crucial. This step ensures safety and stability, especially if you have kids or pets who might bump into it. Begin by checking the wall for studs. Use a stud finder to locate these structural supports behind your drywall. Securing your cabinet to studs is the best way to ensure it stays put. Gather your tools. You’ll need a drill, screws, and brackets. These will help anchor your cabinet firmly. Drill holes into the back of the cabinet, aligning them with the studs. Use screws long enough to penetrate deep into the studs for maximum hold. Test the stability. Once secured, give your cabinet a gentle shake. It should feel solid. If there's any wobble, double-check your screws and brackets. Have you ever installed a cabinet and it seemed secure until you started filling it with items? It’s always better to err on the side of caution. Ensuring your cabinet is properly secured can prevent accidents and keep your kitchen organized. Reflect on how this process could improve your kitchen setup. Could repositioning some cabinets optimize your space even further?
Maintenance Tips
Building a kitchen storage cabinet requires planning and simple tools. Measure the space and gather materials like wood and screws. Cut and assemble pieces carefully, ensuring stability and safety. Add shelves to maximize storage. Finish with paint or varnish for durability.
Keep tools handy for future adjustments.
Building a storage cabinet for your kitchen is a rewarding project that adds both functionality and style to your space. But the journey doesn't end once the cabinet is installed. To keep your cabinet looking its best and functioning smoothly, regular maintenance is key. Here are some practical tips to ensure your kitchen cabinet remains in top-notch condition for years to come.
Regular Cleaning
Dust and grease are your cabinet's worst enemies. A quick wipe-down with a damp cloth can do wonders. Use mild soap and water for more stubborn stains. Avoid harsh chemicals that can damage the finish.
Inspect For Wear And Tear
Regularly check for loose screws or hinges. These can cause doors to sag or not close properly. Tightening them is usually a quick fix. If you notice any cracks or chips, address them immediately to prevent further damage.
Protect Against Moisture
Moisture is a common kitchen hazard. Always wipe spills immediately to prevent water damage. Consider using a water-resistant finish if your cabinet is near the sink or stove.
Organize And Declutter
Overloading shelves can lead to warping. Keep your items organized and periodically declutter. This not only prolongs the life of your cabinet but also makes it easier to find what you need.
Lubricate Moving Parts
Hinges and drawer slides can become stiff over time. A little lubrication can keep them moving smoothly. Use a silicone spray or a light oil and apply sparingly.
Consider Seasonal Adjustments
Wood can expand and contract with temperature changes. If your cabinet doors or drawers are sticking, check for alignment issues. Sometimes a simple adjustment can solve the problem.
Personal Experience: The Importance Of Regular Checks
I once ignored a small squeak in my kitchen cabinet, thinking it was no big deal. A few months later, the door was hanging off its hinges. Lesson learned: regular checks can save you from bigger headaches down the road.
Engage Your Senses
Does your cabinet have a musty smell? This could be a sign of mold. Regularly airing out the cabinet and using moisture absorbers can prevent this issue. Your nose can be an early warning system for hidden problems. By taking these proactive steps, you can ensure your kitchen storage cabinet remains a reliable and attractive part of your home. What maintenance tips have you found helpful in keeping your cabinets in great shape?

Credit: www.tiktok.com
Frequently Asked Questions
How Do I Start Building A Kitchen Cabinet?
Begin by gathering materials like plywood, screws, and hinges. Measure your space to determine cabinet dimensions. Design the layout, focusing on functionality. Cut the plywood to size, assemble the frame, and attach doors. Finish with sanding and painting for durability and aesthetics.
What Tools Are Needed For Cabinet Construction?
You'll need a saw, drill, screwdriver, and measuring tape. A level ensures precision, while clamps hold pieces securely. Sandpaper smooths surfaces before painting. These tools are essential for efficient cabinet building and ensure accuracy in measurements and assembly.
How Do I Choose The Right Wood?
Select wood based on durability and budget. Plywood is cost-effective and strong, ideal for cabinets. Solid wood offers a premium look but costs more. Consider moisture resistance for kitchen use. Choose a wood finish that complements your kitchen design.
Can I Customize Cabinet Designs?
Yes, customization is possible. Adjust dimensions to fit your kitchen layout. Choose unique finishes and handles to match your style. Add features like pull-out shelves or spice racks for functionality. Customization allows personalization and maximizes space efficiency.
Conclusion
Building a kitchen storage cabinet is a rewarding project. It saves space and organizes your kitchen. With basic tools and materials, it's achievable. Follow the steps and take your time. Measure twice, cut once. This ensures accuracy and a perfect fit.
Customize it to match your kitchen style. Choose durable materials for long-lasting use. You can proudly display your handiwork when done. Enjoy the extra storage and tidiness it brings. A homemade cabinet adds character to your kitchen. Now, get started on your own kitchen project.
Happy building!