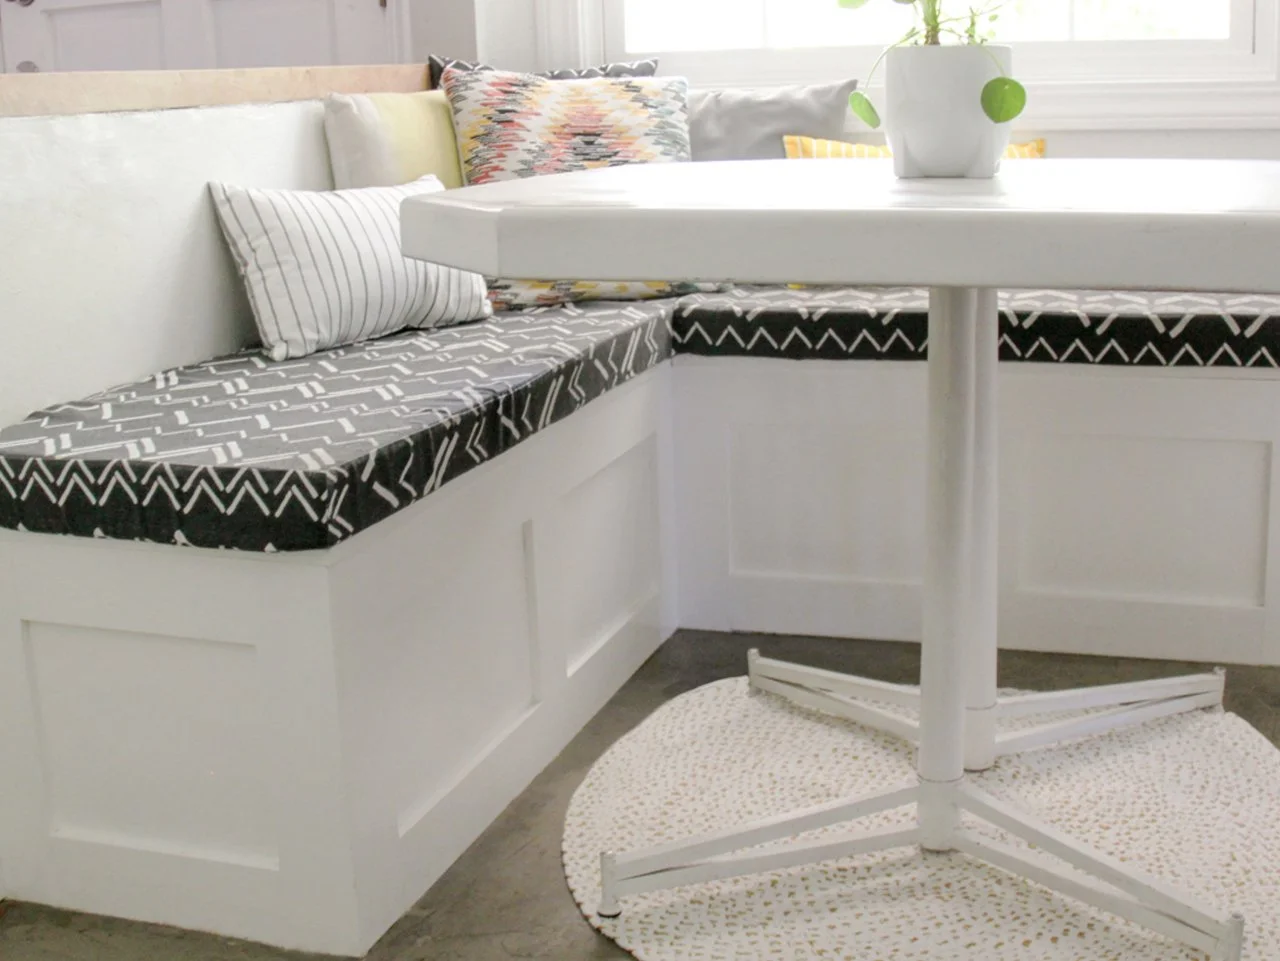
Imagine transforming your kitchen into a more organized and stylish space with just one project. A kitchen bench seat with storage could be the perfect solution for you.
Not only does it offer a cozy spot to relax, but it also provides much-needed storage for all those odds and ends that clutter your countertops. You don't need to be a master carpenter to make this happen. With a few tools, some materials, and a bit of creativity, you can build a bench seat that fits your space and style perfectly.
Ready to dive in and discover how you can enhance your kitchen’s functionality and charm? Stick around, and you'll learn the step-by-step process to create your very own kitchen bench seat with storage, making your kitchen both beautiful and practical.
Credit: www.hgtv.com
Materials And Tools Needed
Creating a kitchen bench seat with storage is an exciting project. It combines functionality with style, offering a place to sit and store items. To ensure success, gather the right materials and tools. This section will guide you through what you'll need.
Materials
Start with sturdy plywood sheets. They form the bench's structure. Opt for high-quality wood to ensure durability. Consider soft padding for comfort. Upholstery fabric adds a touch of style. Choose a color that complements your kitchen.
Storage hinges are essential. They allow the seat to open and close smoothly. Wood screws and brackets provide stability. They keep the structure solid. Sandpaper smooths the wood surfaces. Finish with varnish for a polished look.
Tools
A saw is crucial for cutting the plywood. Ensure it’s sharp for clean cuts. Use a drill for screwing parts together. A tape measure helps with accurate measurements. A screwdriver tightens screws securely.
A staple gun attaches the fabric to the seat. A sander prepares the wood for varnishing. Safety goggles protect your eyes during work. Gloves keep your hands safe from splinters.
With these materials and tools, you're ready to build. Enjoy the process and create a beautiful bench seat for your kitchen.

Credit: gntos.org
Choosing The Right Location
Creating a kitchen bench seat with storage starts with choosing the right location. The location impacts the functionality and aesthetic of your kitchen space. It's important to consider several factors before deciding where to place your bench seat.
Consider Traffic Flow
Think about how people move through your kitchen. You want the bench to fit seamlessly into the space. Avoid placing it where it might obstruct paths or cause congestion.
Evaluate Available Space
Measure the area where you plan to install the bench. Ensure there's enough room for the bench and storage. Keep in mind the space needed for opening storage compartments.
Sunlight And Lighting
Check how natural light hits the potential area. A well-lit spot can enhance the appearance of your bench seat. Consider additional lighting if the area is dim.
Proximity To Kitchen Features
Locate your bench near useful kitchen areas. Close proximity to the dining table or cooking area can increase convenience. It can serve multiple purposes in your kitchen routine.
Accessibility And Comfort
Ensure the bench is easy to access. Think about comfort when someone sits on it. Consider the height and depth for a pleasant seating experience.
Style And Aesthetic
Match the bench with your kitchen style. Consider the colors, materials, and design. It should complement existing decor and enhance the overall look.
Designing The Bench Seat
Transform your kitchen with a bench seat featuring built-in storage. This practical design offers a cozy seating area while maximizing space. Create a functional and stylish nook, perfect for organizing kitchen essentials.
Designing a kitchen bench seat with storage is an exciting DIY project that can transform your kitchen space. This project not only enhances the aesthetics of your kitchen but also adds valuable storage. Before you dive into building, it’s crucial to spend time on the design phase. A well-planned design ensures your bench seat fits perfectly and serves your storage needs.
Measuring The Space
Start by measuring the space where you want the bench seat to be. Accurate measurements are the foundation of a successful project. Use a measuring tape to get the length, width, and height of the available area. Consider any obstructions like radiators or windows that might affect the bench's placement. Write down these measurements and double-check them. Even a small error can lead to a bench that doesn’t fit.
Sketching The Layout
Once you have your measurements, it’s time to sketch your layout. Grab a piece of paper and a pencil. Drawing your design helps visualize the final product. Think about the style and functionality you want. Should the seat have a backrest, or will it be a simple bench? Decide on the type of storage you need. Open shelves or closed cabinets? Sketch different ideas until you find one that resonates with you. Consider how the design will complement your kitchen’s current décor. Would you prefer a modern look or something more rustic? Your sketch will act as a blueprint as you build. Designing a bench seat with storage is a creative process. What design ideas spark your interest?
Cutting The Wood Pieces
Creating a kitchen bench seat with storage begins with precise cutting. The wood pieces form the foundation of your project. Accurate measurements and cuts ensure a perfect fit. This section guides you through selecting and cutting wood efficiently.
Selecting The Wood Type
Choose durable wood for your bench seat. Oak and pine are popular choices. Each offers strength and beauty. Pine is more affordable. Oak provides a rich, classic look. Consider the aesthetic and budget before making a choice. Ensure the wood is free from cracks and knots.
Safety Tips For Cutting
Always prioritize safety when cutting wood. Wear protective goggles to shield your eyes. Use ear protection to guard against loud tool noises. Ensure your workspace is clean and well-lit. Secure the wood piece firmly before cutting. This prevents movement and ensures a clean cut. Follow all tool instructions carefully.
Assembling The Frame
Begin by laying out the wooden pieces for the frame. Secure them with screws to ensure stability. This forms the sturdy base for your kitchen bench seat with storage.
Assembling the frame is the core step in building a kitchen bench seat with storage. It's vital to create a sturdy and durable base. This ensures the bench is safe and long-lasting. Follow these simple steps for a successful project.
Joining Techniques
Use strong joints for a solid frame. The most common types are butt joints and dowel joints. Butt joints are simple and require screws. Dowel joints use wooden pins for extra strength. Both methods keep the frame pieces together. Choose the one that fits your skills and tools.
Reinforcing The Structure
Reinforcement adds durability to the bench frame. Corner braces provide extra support. Attach them at each corner where the wood pieces meet. This prevents wobbling and increases stability. Use metal brackets to strengthen the joints. They keep the frame secure and aligned. Always double-check each connection for firmness. This ensures your bench is strong and ready for use.

Credit: www.youtube.com
Adding Storage Compartments
Transform your kitchen bench into a practical storage space. Install compartments underneath the seat for easy access to kitchen essentials. Keep your cooking area organized and clutter-free with this simple DIY solution.
Adding storage compartments to your kitchen bench seat is a smart way to maximize space and keep your kitchen organized. Imagine having a neatly tucked-away spot for those extra pots, pans, or even your kids' coloring books and games. This section will guide you through the steps to integrate functional storage into your bench seat design.
Designing Storage Solutions
Begin by assessing your storage needs. Do you need a space for large items like baking trays, or are you looking for compartments for smaller gadgets? Sketch out your ideas. Consider the size of your bench seat and how you can divide it into functional sections. Use graph paper for precision, and make sure you measure your items to avoid wasted space. Think vertically and horizontally. Can you add shelves or dividers? Adding a vertical divider could double your storage options, making it easier to organize your items efficiently.
Installing Hinges And Lids
Choose sturdy hinges that can withstand daily use. Look for soft-close hinges if you want to prevent slamming and ensure quiet operation. Position the hinges correctly. Attach them at equal distances from the edges to ensure a smooth opening motion. You might need a helping hand to hold things in place while you secure them. Consider adding hydraulic lifts. These can make opening the lids effortless, especially if you're holding something in one hand. Plus, they help to keep the lids open, making it easier to access your stored items. By crafting a kitchen bench seat with storage, you not only enhance the functionality of your space but also add a personal touch to your home. What creative ways can you think of to make your storage work for you?
Finishing Touches
Creating a kitchen bench seat with storage adds value to your home. After building, focus on the finishing touches. These final steps ensure your bench looks polished and professional. Pay attention to detail for the best results. Sanding and painting transform your project. They bring out the beauty of the wood. Let's explore these essential finishing steps.
Sanding And Smoothing
Start with sanding the surface of your bench. Use fine-grit sandpaper for the best results. Sanding removes rough edges and splinters. It makes the wood smooth to touch. A smooth surface is crucial for an even finish. Always sand in the direction of the grain. This prevents scratches and enhances the wood's natural beauty. Wipe the bench with a damp cloth after sanding. This removes dust and prepares it for finishing.
Painting Or Staining
Choose between painting or staining your bench. Each option offers a unique look. Painting allows for a colorful finish. It can match your kitchen's color scheme. Use a primer before painting for a long-lasting effect. Staining highlights the wood's natural grain. It offers a classic and warm appearance. Apply a clear coat to protect your paint or stain. This ensures durability and longevity. Allow adequate drying time between coats. This avoids smudges and ensures a smooth finish.
Cushion And Upholstery
Creating a kitchen bench seat with storage involves crafting a comfortable cushion and stylish upholstery. These elements enhance the functionality and aesthetics of your space. Efficient design maximizes storage while adding charm to your kitchen area.
Creating a kitchen bench seat with storage can be a rewarding DIY project, adding both style and function to your home. One of the most exciting parts of this project is designing the cushion and upholstery. This step not only adds comfort but also allows you to inject personality into your space. Whether you lean towards vibrant patterns or prefer a minimalist look, the choices you make here will significantly impact the overall aesthetic of your kitchen.
Choosing Fabric
Selecting the right fabric is crucial. You'll want something durable that can withstand daily use and occasional spills. Cotton blends and synthetic fabrics are often popular choices due to their durability and ease of cleaning. Consider the color scheme of your kitchen. Do you want the bench seat to blend in or stand out? A bold color can make your bench a focal point, while neutral tones offer a classic, versatile look. Don't forget texture! A soft, plush fabric can add a cozy touch, while a sleek, smooth material might convey a modern feel. Test fabric samples in your kitchen's lighting to see how they interact with the space.
Attaching The Cushion
Once you’ve chosen your fabric, it’s time to attach the cushion. This step requires precision and a bit of patience but can be highly satisfying once completed. Start by cutting the foam to fit the seat dimensions. Wrap your chosen fabric around the foam, ensuring it’s taut but not overly stretched. Using a staple gun, securely fasten the fabric underneath the seat. This method provides a clean finish and keeps the fabric in place. Consider adding ties or velcro strips if you anticipate needing to remove the cushion for washing. This small detail can make maintenance much easier and prolong the life of your fabric. Have you ever thought about adding decorative buttons or piping to your cushion? These details can elevate the look and give your bench a custom feel. It's the little things that make a big impact! Incorporating a cushion and upholstery into your kitchen bench project allows for creativity and personalization. What's your vision for your kitchen space?
Maintenance Tips
Maintaining a kitchen bench seat with storage is essential for its longevity. Regular care keeps the seat looking fresh and functional. Following a few simple tips can ensure your bench remains in top condition for years.
Cleaning And Care
Dust the bench regularly using a soft, damp cloth. Avoid harsh chemicals that may damage the finish. Use mild soap and water for deeper cleaning. Wipe spills immediately to prevent stains and discoloration. Ensure the bench stays dry to avoid moisture damage.
Repair And Upkeep
Check for loose screws or hinges periodically. Tighten them to ensure stability. If the wood shows signs of wear, consider sanding and reapplying a protective finish. Address small nicks or scratches with a wood filler. For larger repairs, consult a professional to maintain quality.
Frequently Asked Questions
What Materials Do I Need For A Bench Seat?
To make a kitchen bench seat with storage, you'll need plywood, wood screws, hinges, and paint. Additional tools include a saw, drill, and measuring tape. These materials ensure durability and functionality, while the paint adds a personal touch to match your kitchen decor.
How Can I Ensure The Bench Is Sturdy?
Ensure sturdiness by using quality plywood and securing joints with wood screws. Reinforce corners with brackets and test stability after assembly. Regularly check and tighten screws to maintain strength over time. Proper construction ensures your bench seat remains stable and reliable.
Can I Customize The Bench Seat Design?
Yes, customization is possible! Choose paint colors, add cushions, or modify dimensions to fit your space. Personal touches like patterned fabric or unique handles enhance aesthetic appeal. Customization allows your bench seat to reflect your style and complement your kitchen's decor.
How Much Time Will The Project Take?
The project typically takes a weekend to complete, depending on your experience. Allocate time for planning, cutting materials, and assembling the bench. Painting and finishing touches may require additional time for drying. Proper preparation helps streamline the process efficiently.
Conclusion
Creating a kitchen bench seat with storage is a rewarding project. It enhances your kitchen’s functionality and style. You gain extra seating and valuable storage space. The process involves basic woodworking skills and tools. Careful planning ensures a perfect fit in your space.
Choose materials that match your kitchen decor. Remember, safety first when using tools. Personalize your bench with cushions or paint. Enjoy your new, practical kitchen feature. It’s a smart solution for small spaces. Now, your kitchen feels more organized and welcoming.
Happy building!